CSSアニメーションでHTML用をスクロール時に表示する
1
プラグインを使わずに多彩な動作を実現します.
アニメスタ
アニメスタはPluginではなく,Web上でcssを表示するWebページです.
cssで動作を実装するのではなく,
https://animista.net/play/basic/slide/slide-bottom
##
1
プラグインを使わずに多彩な動作を実現します.
アニメスタはPluginではなく,Web上でcssを表示するWebページです.
cssで動作を実装するのではなく,
https://animista.net/play/basic/slide/slide-bottom
##
1
Avadaで,アイコンが上手く表示されないバグを直します.SSL化によるもの,CORSポリシーに関するもの,キャッシュに由来するものの3つの原因があります.

.htaacessでCORSを許可するコマンドを入れます.
# Apache config
<FilesMatch ".(eot|ttf|otf|woff)">
 Header set Access-Control-Allow-Origin "*"
</FilesMatch>キャッシュを削除します,
何らかの原因でフォントだけ非SSL通信で読み込んでいる場合,ブラウザ側でブロックすることがあります.この場合,「Better Search Replace」などのプラグインを使ってhttp://を https:// で置き換えてください.
XserverのWordPress簡単インストールを使っているとフォントだけhttp://で読み込んでしまう問題が発生します.簡単インストールの場合,「Better Search Replace」を使った対応では上手くいきません.WordPressを手動でインストールすると上手くいきました.
1
Avadaをはじめとする海外テーマでは,デモサイトをインポートできます.デモサイトはかなりの数用意されていますが,その中から自分が作りたいイメージに近いものをインポートした後,カスタマイズしてサイトを作成するという流れが一般的です.
デモサイトの実態は,そのテーマ(例えばAvadaやEnfoldなど)で作られた固定ページや投稿ページです.テーマそのもので手動で同じものを作れるのですが,手間を省くために用意されております.
ここでは,Avadaのおすすめのデモサイトを紹介します.
シンプルなもので良いならこれがおすすめ.
ダサくない程度に動きもあって,構成もシンプルなのでカスタマイズ示唆そうです.
印象の強いランディングページならこちらがおすすめです.
動きがあって,読者は自然にスクロールしてしまうと思います.用意する写真の数も少なくて良ささそうです.製品,アプリなど幅広く使えます.
・イベント向けのサイトを作りたいなら動画を多用するこちらがいいです
写
・明るい印象のサイトです.少し古めのデザインですが,みやすくて親しみやすいです.
写
用意できる写真がたくさんある人限定になってしまうのが難点です.
・個人的には一番使いやすくておすすめです.
・ミニサイトでおすすめのデモデザインです.
・力強いサイトを作りたいならこれ.
個人的には好きです.
#
ヨガ教室を開くならこのサイトはかなりおすすめです.
1
WordPressの有料テーマで一番人気のAvadaでWebサイトを構築する際,特定のコンテナがモバイルで表示されない問題に直面しました.
Avadaでは,コンテナごとにRendering Logicでデバイスや引数,ユーザーロールなどに応じて表示するかどうかを決めることができます.デフォルトのテーマでは,Rendering Logicでデバイスタイプがモバイルではない場合に表示,となっていたりします.PCでは表示されるのにモバイルでは表示されない,というトラブルに遭遇した時には下記の対応で解決します.
まず,該当の固定ページに行きます.
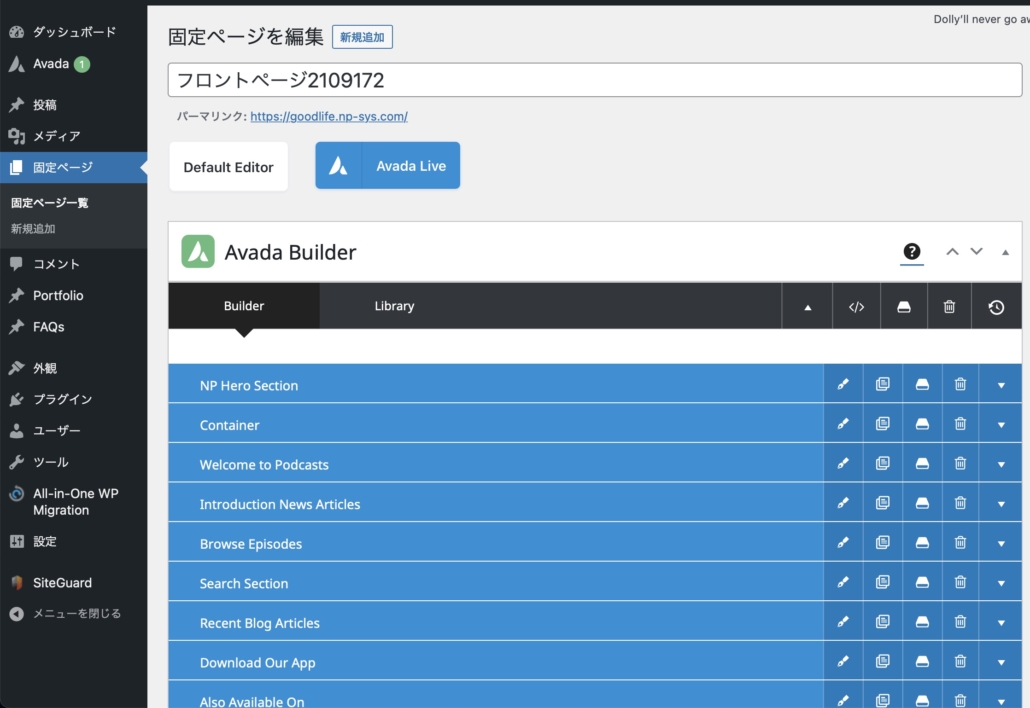
表示されないコンテナを編集するために,鉛筆ボタンを押して編集画面を出します

ExtrasタブでRendering logicのところで,Device Typeが指定されているので,これを削除します.
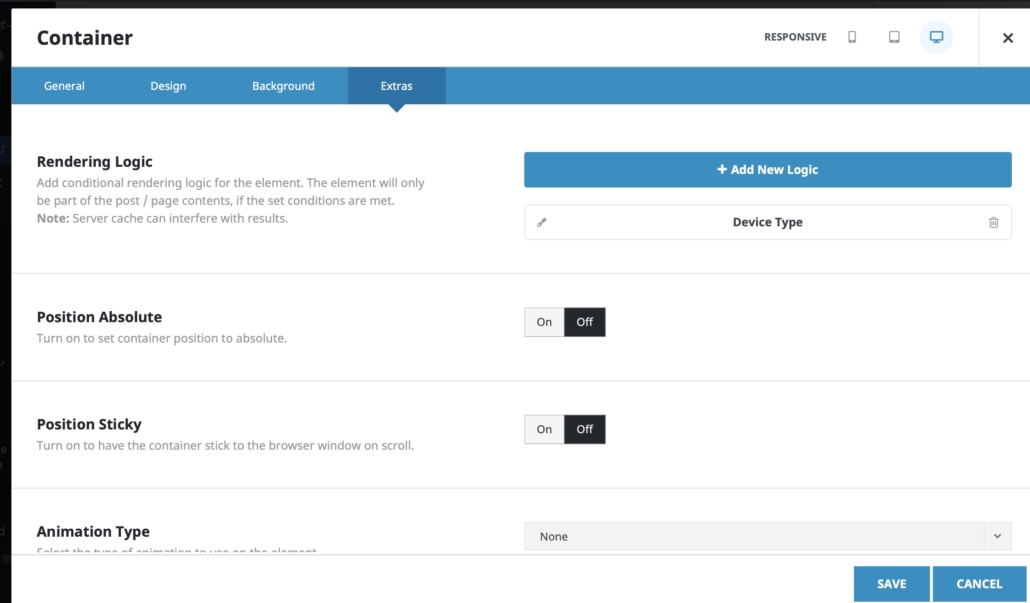
Avadaでは,コンテナごとにRendering Logicでデバイスや引数,ユーザーロールなどに応じて表示するかどうかを決めることができます.デフォルトのテーマでは,Rendering Logicでデバイスタイプがモバイルではない場合に表示,となっていたりします.PCでは表示されるのにモバイルでは表示されない,というトラブルに遭遇した時にどうぞ.
1
いろんなプラグインがあります.以前は
https://github.com/rahadur/capacitor-admob
を使っていましたが,メンテナンスされていないようなので現在使うのはおすすめじゃないです.
今は
https://github.com/capacitor-community/admob
を使うのが良さそうです.
Android Studioの設定は別途ドキュメントで行うとして,バナーを表示するソースコードはtsファイルで下記のようにするだけで表示されました.
import { Component } from '@angular/core';
import { AdMob, BannerAdOptions, BannerAdSize, BannerAdPosition, BannerAdPluginEvents, AdMobBannerSize } from '@capacitor-community/admob';

@Component({
  selector: 'app-tab1',
  templateUrl: 'tab1.page.html',
  styleUrls: ['tab1.page.scss']
})


export class Tab1Page {


  constructor() {
    AdMob.initialize({
      requestTrackingAuthorization: true,
      //testingDevices: ['2077ef9a63d2b398840261c8221a0c9b'],
      //initializeForTesting: true,
    });
  }

  ionViewDidEnter(){

    AdMob.addListener(BannerAdPluginEvents.Loaded, () => {
      // Subscribe Banner Event Listener
      console.log('loaded');
    });

    AdMob.addListener(BannerAdPluginEvents.SizeChanged, (size: AdMobBannerSize) => {
      // Subscribe Change Banner Size
      console.log('size changed');

    });

    const options: BannerAdOptions = {
      adId: 'ca-app-pub-3940256099942544/15453xxxxxx',//test
      adSize: BannerAdSize.BANNER,
      position: BannerAdPosition.BOTTOM_CENTER,
      margin: 100,
      isTesting: true
      // npa: true
    };
    AdMob.showBanner(options);

  }

}
moduleファイルには何の記載もなくてOK
1
Google Cloud のStorageからJavaScriptで画像をダウンロードしてCanvasに書き込んだとき,そのCanvas要素の画像をtoDataURL()メソッドでdataURIに変換する際に
Failed to execute 'toDataURL' on 'HTMLCanvasElement': Tainted canvases may not be exported.というエラーが出る.直訳すると
「HTMLCanvasElement」で「toDataURL」の実行に失敗しました:汚染されたキャンバスはエクスポートされない可能性があります。つまり,Corsポリシーに引っかかってしまう.解決するためにはフロントエンドのJavaScriptで任意のドメインからのデータを利用できるように明示的に指定する必要と,生成元からデータを返す際にCorsポリシーを適用しないドメインを明示的に指定する必要がある.
Canvas要素に描く際に生成元をanounymousに設定すればいい
  download(){
    var gsReference = this.firestorage.refFromURL('gs://my-app.appspot.com/imgs/'+this.authUid +'/'+this.query_img_name)
    const task = gsReference.getDownloadURL().subscribe(dataurl => {
      console.log(dataurl,'tsk');
      const image = new Image();
      image.onload = () => {
        this.canvas.nativeElement.width = image.width;
        this.canvas.nativeElement.height = image.height;
        this.canvas_rendering_context.drawImage(image, 0, 0);
      }
      (→これを追加)image.crossOrigin = "anonymous";
      image.src = dataurl;

    })
}今回はGoogle CloudのStorageから画像をダウンロードしている.従ってStorageの設定をいじる必要がある.
my-cors.jsonなどのファイルを使って設定情報を書いたあと,gsutilコマンドを使ってStorageに反映させればいい.
touch my-cors.json
 nano my-cors.json
my-cors.jsonは下記のように変更しておく
[
    {
      "origin": ["*"],
      "method": ["GET","POST"],
      "responseHeader": ["Content-Type"],
      "maxAgeSeconds": 3600
    }
]
あとはコマンドから反映させる
gsutil cors set ./my-cors.json gs://my-app.appspot.com https://cloud.google.com/storage/docs/configuring-cors
1
標準機能なので追加のインストールは必要ありません.module.tsで@angular/commonからDatePipeをインストールし,providersに登録します.
import { IonicModule } from '@ionic/angular';
import { RouterModule } from '@angular/router';
import { NgModule } from '@angular/core';
import { CommonModule } from '@angular/common';
import { FormsModule } from '@angular/forms';
import { Tab3Page } from './tab3.page';
import { ExploreContainerComponentModule } from '../explore-container/explore-container.module';
+import { DatePipe } from '@angular/common';

import { Tab3PageRoutingModule } from './tab3-routing.module';

@NgModule({
  imports: [
    IonicModule,
    CommonModule,
    FormsModule,
    ExploreContainerComponentModule,
    RouterModule.forChild([{ path: '', component: Tab3Page }]),
    Tab3PageRoutingModule,
  ],
-  declarations: [Tab3Page]
+  declarations: [Tab3Page],
+  providers: [DatePipe]
})
export class Tab3PageModule {}
次に,page.tsファイルで読み込みます.
import { Component,ElementRef,ViewChild } from '@angular/core';
+import { DatePipe } from '@angular/common';

@Component({
  selector: 'app-tab3',
  templateUrl: 'tab3.page.html',
  styleUrls: ['tab3.page.scss']
})
export class Tab3Page {

  constructor(
+    private datePipe: DatePipe
  ) {
  }

  ionViewDidEnter(){
  }

}
import { Component,ElementRef,ViewChild } from '@angular/core';
import { DatePipe } from '@angular/common';

@Component({
  selector: 'app-tab3',
  templateUrl: 'tab3.page.html',
  styleUrls: ['tab3.page.scss']
})
export class Tab3Page {
+  time_on_html:any;
  constructor(
    private datePipe: DatePipe
  ) {
  }

  ionViewDidEnter(){
+    this.time_on_html = new Date();
+    console.log(this.time_on_html);
  }

}
そして,HTML側は{{time_on_html | date:”MM/dd/yy” }}で参照します.
import { Component,ElementRef,ViewChild } from '@angular/core';
import { DatePipe } from '@angular/common';

@Component({
  selector: 'app-tab3',
  templateUrl: 'tab3.page.html',
  styleUrls: ['tab3.page.scss']
})
export class Tab3Page {
  time_on_html:any;
  constructor(
    private datePipe: DatePipe
  ) {
  }

  ionViewDidEnter(){
    this.time_on_html = this.datePipe.transform(new Date(), 'yyyyMMddHHmmss');
    console.log(this.time_on_html);

  }

}
2021/07/19 18:42:52と表示される.
1
Capacitorのカメラプラグインでの動作記録
image2.onloadファンクションでアロー関数を使う場合
export class Tab3Page {
  @ViewChild('canvas') public canvas: ElementRef;
  public cx: CanvasRenderingContext2D;

  constructor(
  ) {}

  ionViewDidEnter(){
    this.startCamera();
    const canvasEl: HTMLCanvasElement = this.canvas.nativeElement;
    this.cx = canvasEl.getContext('2d');
  }

async startCamera(){
    const imageFunc = await Camera.getPhoto({
      quality: 90,
      allowEditing: false,
      resultType: CameraResultType.Uri,
    }).then((image) => {

      // image.webPath will contain a path that can be set as an image src.
      // You can access the original file using image.path, which can be
      // passed to the Filesystem API to read the raw data of the image,
      // if desired (or pass resultType: CameraResultType.Base64 to getPhoto)
      var imageUrl = image.webPath;
      console.log(imageUrl);

      let image2:any = new Image();
      image2.onload = () => {
        console.log(image2.width);
        console.log(image2.height);
        this.cx.canvas.width = image2.width;
        this.cx.canvas.height = image2.height;
        aa.drawImage(image2, 0, 0);
        console.log('done');
      }
      image2.src = imageUrl;
    });
  };
よく乗っているもの
  export class Tab3Page {
  @ViewChild('canvas') public canvas: ElementRef;
  public cx: CanvasRenderingContext2D;

  constructor(
  ) {}

  ionViewDidEnter(){
    this.startCamera();
    const canvasEl: HTMLCanvasElement = this.canvas.nativeElement;
    this.cx = canvasEl.getContext('2d');
  }

async startCamera(){
    const imageFunc = await Camera.getPhoto({
      quality: 90,
      allowEditing: false,
      resultType: CameraResultType.Uri,
    }).then((image) => {

      // image.webPath will contain a path that can be set as an image src.
      // You can access the original file using image.path, which can be
      // passed to the Filesystem API to read the raw data of the image,
      // if desired (or pass resultType: CameraResultType.Base64 to getPhoto)
      var imageUrl = image.webPath;
      console.log(imageUrl);
      let canvasVar:any =this.cx;

      let image2:any = new Image();
      let aa:any =this.cx;
      image2.onload = function() {
        canvasVar.canvas.width = image2.width;
        canvasVar.canvas.height = image2.height;
        aa.drawImage(image2, 0, 0);
        console.log('done');
      }
      image2.src = imageUrl;
    });
  };
bind(this)を使ってこれでもいく
export class Tab3Page {
  @ViewChild('canvas') public canvas: ElementRef;
  public cx: CanvasRenderingContext2D;

  constructor(
  ) {}

  ionViewDidEnter(){
    this.startCamera();
    const canvasEl: HTMLCanvasElement = this.canvas.nativeElement;
    this.cx = canvasEl.getContext('2d');
  }

async startCamera(){
    const imageFunc = await Camera.getPhoto({
      quality: 90,
      allowEditing: false,
      resultType: CameraResultType.Uri,
    }).then((image) => {

      // image.webPath will contain a path that can be set as an image src.
      // You can access the original file using image.path, which can be
      // passed to the Filesystem API to read the raw data of the image,
      // if desired (or pass resultType: CameraResultType.Base64 to getPhoto)
      var imageUrl = image.webPath;
      console.log(imageUrl);
      let canvasVar:any =this.cx;

      let image2:any = new Image();
      let aa:any =this.cx;
      image2.onload = function() {
        this.cx.canvas.width = image2.width;
        this.cx.canvas.height = image2.height;
        aa.drawImage(image2, 0, 0);
        console.log('done');
      }.bind(this)
      image2.src = imageUrl;
    });
  };
https://stackoverflow.com/questions/30824756/javascript-saving-this-variable-inside-of-image-onload
1
Angular(Ionic)でカスタムコンポーネントを使ってアコーディオンを作成する方法です.
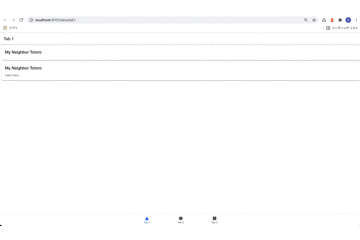
今回はIonicのTabsプロジェクトをもとに作成し,Tab1に設置することにします.
まず,tab1の中にコンポーネントを作成します.
ionic g component tab1/components/expandable次に作成したコンポーネントを下記のように書き換えます.
<div #expandWrapper class='expand-wrapper' [class.collapsed]="!expanded">
    <ng-content></ng-content>
</div>
.expand-wrapper {
transition: max-height 0.4s ease-in-out;
overflow: hidden;
height: auto;
}
.collapsed {
max-height: 0 !important;
}
import { Component, AfterViewInit, Input, ViewChild,  ElementRef, Renderer2 } from "@angular/core";

@Component({
  selector: 'app-expandable',
  templateUrl: './expandable.component.html',
  styleUrls: ['./expandable.component.scss'],
})
export class ExpandableComponent implements AfterViewInit {
  @ViewChild("expandWrapper", { read: ElementRef }) expandWrapper: ElementRef;
  @Input("expanded") expanded: boolean = false;
  @Input("expandHeight") expandHeight: string = "150px";

  constructor(public renderer: Renderer2) {}

  ngAfterViewInit() {
    this.renderer.setStyle(this.expandWrapper.nativeElement, "max-height", this.expandHeight);
  }
}
以上でコンポーネントは作成できました.
次にTab1にコンポーネントを登録します.moduleで読み込んで,declarationsに登録します.これによりapp-expandableタグを使ってTab1のHTMLからコンポーネントを呼び出せるようになります.
import { IonicModule } from '@ionic/angular';
import { NgModule } from '@angular/core';
import { CommonModule } from '@angular/common';
import { FormsModule } from '@angular/forms';
import { Tab1Page } from './tab1.page';
import { ExploreContainerComponentModule } from '../explore-container/explore-container.module';

import { Tab1PageRoutingModule } from './tab1-routing.module';
import { ImageCropperModule } from 'ngx-image-cropper';

+import { ExpandableComponent } from "./components/expandable/expandable.component";

@NgModule({
  imports: [
    IonicModule,
    CommonModule,
    FormsModule,
    ExploreContainerComponentModule,
    Tab1PageRoutingModule,
    ImageCropperModule
  ],
  declarations: [
    Tab1Page,
+    ExpandableComponent
  ]
})
export class Tab1PageModule {}
実装
あとはtab1.page.htmlとtab1.page.tsに書くだけです.
<ion-header [translucent]="true">
  <ion-toolbar>
    <ion-title>
      Tab 1
    </ion-title>
  </ion-toolbar>
</ion-header>


<ion-content>
  <ion-card (click)="expandItem()">
    <ion-card-header>
      <ion-card-title>My Neighbor Totoro</ion-card-title>
    </ion-card-header>

    <ion-card-content>
      <app-expandable expandHeight="100px" [expanded]="item1expand">
        <p>
          Hello there.
        </p>
      </app-expandable>
    </ion-card-content>
  </ion-card>
  <ion-card (click)="expandItem()">
    <ion-card-header>
      <ion-card-title>My Neighbor Totoro</ion-card-title>
    </ion-card-header>

    <ion-card-content>
      <app-expandable expandHeight="100px" [expanded]="item2expand">
        <p>
          Hello there.
        </p>
      </app-expandable>
    </ion-card-content>
  </ion-card>


</ion-content>
import { Component, ViewChild, ElementRef } from '@angular/core';
import { Observable } from 'rxjs';

@Component({
  selector: 'app-tab1',
  templateUrl: 'tab1.page.html',
  styleUrls: ['tab1.page.scss']
})
export class Tab1Page {
  item1expand:boolean = true;
  item2expand:boolean = false;

  constructor(
  ) {}

  expandItem(): void {
    this.item1expand = !this.item1expand;
    this.item2expand = !this.item2expand;
  }

}
1
Amazonの代わりにAliExpressを使ってみた感想とデメリットです.
購入した経緯はこちら
AliExpressは中国のアリババグループが運営するECモールで,外国人向けに作られているものです.
メリット1:安い
最大のメリットは安価なことです.日本では1400円が相場の電子機器がアリエクスプレスだと800円で買えました.
メリット2:日本にないものがある
結構いい商品があります.目ききの能力があれば個人輸入もできそうだと思いました.
デメリット1:メールが多い
登録するとメールの配信が多くて,しかも止めることができません.かなり煩わしいです.
→止められました.
デメリット2:
クレジットカードを登録する必要がある.これはAmazonや楽天でも同じなのですが,裏でどのように情報を扱っているか信用できないのである程度の覚悟が必要だと思います.私はデビットカードにしました.
→他でも登録しないといけない以上,AliExperessのデメリットではないですね.
デメリット3:
配送に時間がかかる.3週間程度はかかります.
1
Rasberry Pi4を一式で揃えると結構な値段がします.現在最も一般的なRasberry Pi4の4GBモデルだと本体,電源,HDMIケーブル,SDカードのセットで14000円程度が相場です.
でもRasberry Pi4の本体は8100円しかありません.日本だとどうも電源をはじめとする付属品で高くなっています.
そこで,付属品をいかに安く買うかが重要なのですが,中国のアリエクスプレスという電子モールから買うとかなり安くなります.アリエクスプレスはアリババが運営する海外むけのサイトで,個人での出品が禁止されているサイトなので比較的トラブルが少ないとされています.ここで電源アダプターなどを揃えるとかなり安くなります.
https://comprasyreise.com/shopnow
例えばラズベリーパイで案外高くつく電源アダプターです.5V 3Aとかなり高出力なアダプターであること,端子がUSB TypeCであることからレアで日本で買うと1400円が相場です.しかし,アリエクスプレスだと800円です.
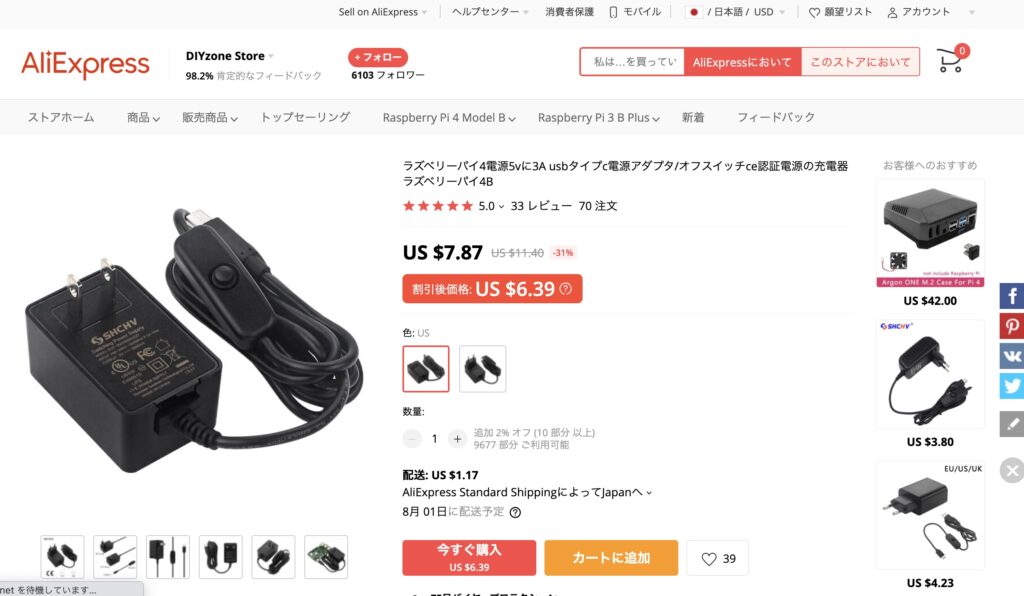
配送料は1.48ドルですのでクーポン使って7.56ドルです.
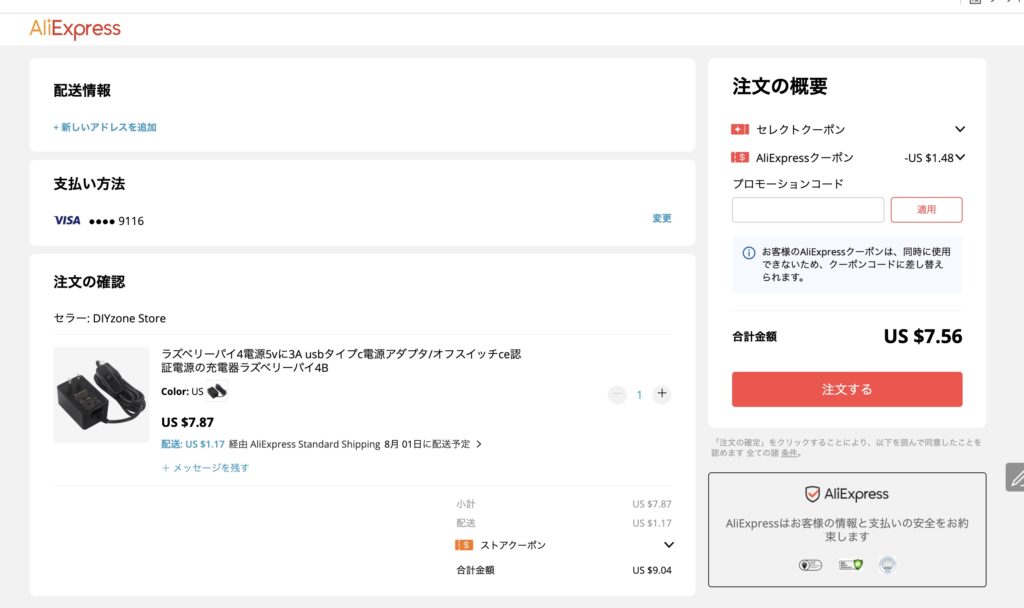
私は普通にクレジットカードで買いました.
このサイトは情報を届ける代わりに広告を出しています.
Python embeddedでmatplotlibを使おうとするとimport errorが起きるエラーです.
import matplotlibこれでエラーが起こる.
ImportError: DLL load failed: The specified module could not be found.原因
matplotlibを動作するにはMicrosoft Visual C++ のダウンロード が必要です.下記からダウンロードする必要があります.
参考文献
1
リアルタイムにデータが移り変わるグラフです.
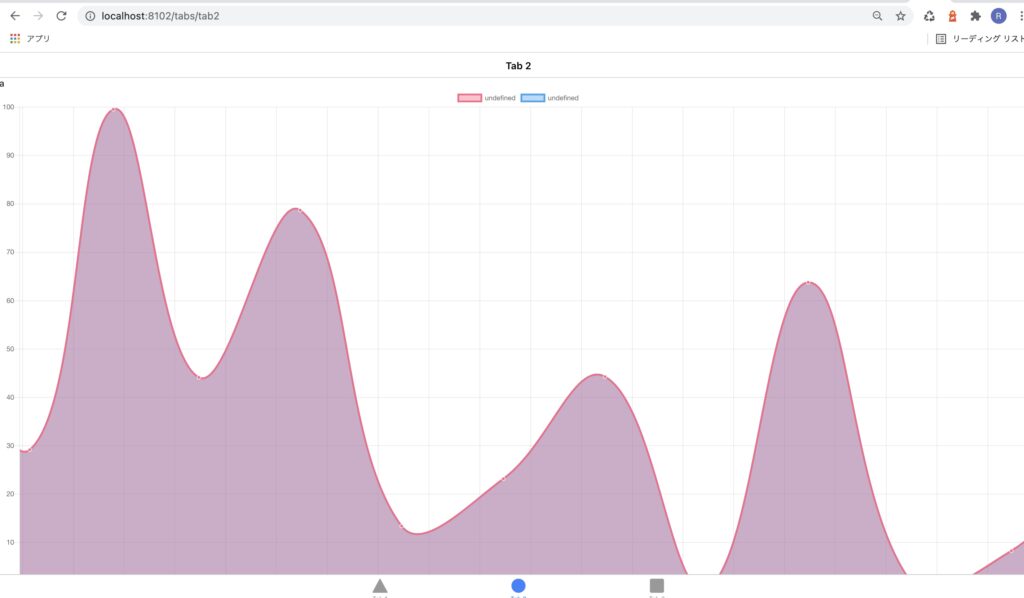
Angularでリアルタイムにデータが移り変わるグラフを作成します.
% ionic start app-name-streaming tabs --type=angularnpm install ng2-charts@2 chartjs-plugin-streaming@1 --save
npm install chart.js@2.9.3 --saveapp.module.tsで設定します.
import { NgModule } from '@angular/core';
import { BrowserModule } from '@angular/platform-browser';
import { RouteReuseStrategy } from '@angular/router';

import { IonicModule, IonicRouteStrategy } from '@ionic/angular';

import { AppRoutingModule } from './app-routing.module';
import { AppComponent } from './app.component';

+import { ChartsModule } from 'ng2-charts';

@NgModule({
  declarations: [AppComponent],
  entryComponents: [],
  imports: [
    BrowserModule,
    IonicModule.forRoot(),
    AppRoutingModule,
+    ChartsModule
  ],
  providers: [{ provide: RouteReuseStrategy, useClass: IonicRouteStrategy }],
  bootstrap: [AppComponent],
})
export class AppModule {}
今回はIonicのタブプロジェクトのtab2に追加します.まずtab2.page.moduleにChartModuleを登録します.
import { IonicModule } from '@ionic/angular';
import { RouterModule } from '@angular/router';
import { NgModule } from '@angular/core';
import { CommonModule } from '@angular/common';
import { FormsModule } from '@angular/forms';
import { Tab2Page } from './tab2.page';
import { ExploreContainerComponentModule } from '../explore-container/explore-container.module';

import { Tab2PageRoutingModule } from './tab2-routing.module';
+import { ChartsModule } from 'ng2-charts';

@NgModule({
  imports: [
    IonicModule,
    CommonModule,
    FormsModule,
    ExploreContainerComponentModule,
    Tab2PageRoutingModule,
+    ChartsModule
  ],
  declarations: [Tab2Page]
})
export class Tab2PageModule {}
次にtab2.page.tsとtab2.page.htmlを編集します.
import { Component } from '@angular/core';
import 'chartjs-plugin-streaming';

@Component({
  selector: 'app-tab2',
  templateUrl: 'tab2.page.html',
  styleUrls: ['tab2.page.scss']
})
export class Tab2Page {

  myDataFromServer:number=20;
  updateMyDataFromServerFunction:any;

  datasets: any[] = [{
    data: []
  }, {
    data: []
  }];

  options: any;
  constructor( ) {}

  ngOnInit(){

    this.options= {
      scales: {
        xAxes: [{
          type: 'realtime',
          realtime: {
            onRefresh: (chart: any) =>{
              chart.data.datasets.forEach((dataset: any) => {
                dataset.data.push({
                  x: Date.now(),
                  y:this.myDataFromServer
                });
              });
            },
            delay: 2000
          }
        }],
        yAxes: [{
          ticks: {
            max:100,
            min:0
          }
        }]
      }
    };
    this.updateMyDataFromServer();
  }

  updateMyDataFromServer(){
    console.log('updateMyDataFromServer() called');
    this.updateMyDataFromServerFunction = setInterval(() => {
      console.log('called');
      this.myDataFromServer = Math.random() * 100;
      console.log(this.myDataFromServer,'this.myDataFromServer');
    },1000)
  }
}
リアルタイムに描写されるグラフが作成できました.

{
  "name": "1206_scrach_image",
  "version": "0.0.1",
  "author": "Ionic Framework",
  "homepage": "https://ionicframework.com/",
  "scripts": {
    "ng": "ng",
    "start": "ng serve",
    "build": "ng build",
    "test": "ng test",
    "lint": "ng lint",
    "e2e": "ng e2e"
  },
  "private": true,
  "dependencies": {
    "@angular/common": "~12.0.1",
    "@angular/core": "~12.0.1",
    "@angular/forms": "~12.0.1",
    "@angular/platform-browser": "~12.0.1",
    "@angular/platform-browser-dynamic": "~12.0.1",
    "@angular/router": "~12.0.1",
    "@ionic/angular": "^5.5.2",
    "@nebulae/angular-ble": "^1.0.6",
    "@types/web-bluetooth": "0.0.9",
    "aes-js": "^3.1.2",
    "chart.js": "^2.9.3",
    "chartjs-plugin-streaming": "^1.9.0",
    "ng2-charts": "^2.4.2",
    "rxjs": "~6.6.0",
    "tslib": "^2.0.0",
    "zone.js": "~0.11.4"
  },
  "devDependencies": {
    "@angular-devkit/build-angular": "~12.0.1",
    "@angular-eslint/builder": "~12.0.0",
    "@angular-eslint/eslint-plugin": "~12.0.0",
    "@angular-eslint/eslint-plugin-template": "~12.0.0",
    "@angular-eslint/template-parser": "~12.0.0",
    "@angular/cli": "~12.0.1",
    "@angular/compiler": "~12.0.1",
    "@angular/compiler-cli": "~12.0.1",
    "@angular/language-service": "~12.0.1",
    "@ionic/angular-toolkit": "^4.0.0",
    "@types/jasmine": "~3.6.0",
    "@types/jasminewd2": "~2.0.3",
    "@types/node": "^12.11.1",
    "@typescript-eslint/eslint-plugin": "4.16.1",
    "@typescript-eslint/parser": "4.16.1",
    "eslint": "^7.6.0",
    "eslint-plugin-import": "2.22.1",
    "eslint-plugin-jsdoc": "30.7.6",
    "eslint-plugin-prefer-arrow": "1.2.2",
    "jasmine-core": "~3.7.1",
    "jasmine-spec-reporter": "~5.0.0",
    "karma": "~6.3.2",
    "karma-chrome-launcher": "~3.1.0",
    "karma-coverage": "~2.0.3",
    "karma-coverage-istanbul-reporter": "~3.0.2",
    "karma-jasmine": "~4.0.0",
    "karma-jasmine-html-reporter": "^1.5.0",
    "protractor": "~7.0.0",
    "ts-node": "~8.3.0",
    "typescript": "~4.2.4"
  },
  "description": "An Ionic project"
}
1
ブラウザ経由でBLEでラズパイと接続する方法についてまとめます.
私はpyblenoというライブラリを使ってペリフェラルを立ち上げることにしましたが,2021年6月現在,ペリフェラルからセントラルに値が変化したときに通知する「Notification」という機能が2018-11-13以降のラズベリーパイOSでは動作しません.公式ドキュメントによると,リナックスカーネルのBluetoothモジュールのバグが原因ということで,通知機能が必須な場合はラズベリーパイのOSを2018-11-13以前にする必要があります.従って,その場合rasbianのStrechやJessiになると思いますのでrasberry piは3B+を使う必要があります.
一方,私はラズベリーパイ4のBモデル(4G)を使ってこの記事を書いていますが,通知機能は使えなかったのでセントラルから定期的に読みに行くことにしてあまり問題は感じていません.
sudo pip3 install pybleno公式に置いてあるサンプルコードを参考に作成しました.main.pyとEchoCharacteristic.pyからなっています.
from pybleno import *
import sys
import signal
from EchoCharacteristic import *

print('bleno - echo');

bleno = Bleno()

def onStateChange(state):
   print('on -> stateChange: ' + state);

   if (state == 'poweredOn'):
     bleno.startAdvertising('echo', ['0000fff0-0000-1000-8000-00805f9b34fb'])
   else:
     bleno.stopAdvertising();

bleno.on('stateChange', onStateChange)

def onAdvertisingStart(error):
    print('on -> advertisingStart: ' + ('error ' + error if error else 'success'));

    if not error:
        bleno.setServices([
            BlenoPrimaryService({
                'uuid': '0000fff0-0000-1000-8000-00805f9b34fb',
                'characteristics': [
                    EchoCharacteristic('0000fff1-0000-1000-8000-00805f9b34fb')
                    ]
            })
        ])
bleno.on('advertisingStart', onAdvertisingStart)

bleno.start()
print ('Hit <ENTER> to disconnect')

if (sys.version_info > (3, 0)):
    input()
else:
    raw_input()

bleno.stopAdvertising()
bleno.disconnect()

print ('terminated.')
sys.exit(1)
from pybleno import Characteristic
import array
import struct
import sys
import traceback
import random

class EchoCharacteristic(Characteristic):

    def __init__(self, uuid):
        Characteristic.__init__(self, {
            'uuid': uuid,
            'properties': ['read', 'write', 'notify'],
            'value': None
          })

        self._value = array.array('B', [0] * 0)
        self._updateValueCallback = None

    def onReadRequest(self, offset, callback):
        try:
            print('EchoCharacteristic - %s - onReadRequest: value = %s' % (self['uuid'], [hex(c) for c in self._value]))
        except:
            print('error')
        #callback(Characteristic.RESULT_SUCCESS, self._value[offset:])
        callback(Characteristic.RESULT_SUCCESS, array.array('B',[20,90,50,100]))
    def onWriteRequest(self, data, offset, withoutResponse, callback):
        #global data
        #data += 1
        self._value = random.randint(1,10)#data
        print('write called')
        print(data,data[0],data.hex(),'data')
        #print('EchoCharacteristic - %s - onWriteRequest: value = %s' % (self['uuid'], [hex(c) for c in self._value]))
        """
        if self._updateValueCallback:
            print('EchoCharacteristic - onWriteRequest: notifying');
            self._updateValueCallback(self._value)
        """

        callback(Characteristic.RESULT_SUCCESS)

    def onSubscribe(self, maxValueSize, updateValueCallback):
        print('EchoCharacteristic - onSubscribe')

        self._updateValueCallback = updateValueCallback

    def onUnsubscribe(self):
        print('EchoCharacteristic - onUnsubscribe');

        self._updateValueCallback = None
“`
<!DOCTYPE html>
<html lang="ja">

<head>
  <meta charset="utf-8"/>
  <title>AI App</title>

  <base href="/"/>

  <meta name="color-scheme" content="light dark"/>
  <meta name="viewport" content="viewport-fit=cover, width=device-width, initial-scale=1.0, minimum-scale=1.0, maximum-scale=1.0, user-scalable=no"/>
  <meta name="format-detection" content="telephone=no"/>
  <meta name="msapplication-tap-highlight" content="no"/>
</head>

<body>
  <h1>お知らせ</h1>
 <div id="text1">Hello BLE</div>
<button id="button1">READ</button>
<button id="button2">Write</button>

<script>

 function uint32ToArrayBuffer(n) {
   const view = new DataView(new ArrayBuffer(4));
   view.setUint32(0, n, false);
   return view.buffer;
 }

//ClickEvent
document.getElementById("button1").addEventListener("click", function(){
    console.log('hi');

    // 1.BLEデバイスをスキャンする
navigator.bluetooth.requestDevice({
  acceptAllDevices:true, // 全てのデバイスを対象にスキャンを実施する
  optionalServices:['0000fff0-0000-1000-8000-00805f9b34fb']
}).then(device => {

  // 2.デバイスに接続
  return device.gatt.connect();

}).then(server =>{

  // 3-1.「Service」を指定
  return server.getPrimaryService("0000fff0-0000-1000-8000-00805f9b34fb");

}).then(service =>{
    console.log('hikoko')

  // 3-2.「Characteristc」を指定
  return service.getCharacteristic("0000fff1-0000-1000-8000-00805f9b34fb");

}).then((characteristic)  => {
    console.log('hikoko2')

    return characteristic.writeValue(uint32ToArrayBuffer(15)).then(char => {
        console.log('write done',char)
    });

    return characteristic.readValue().then(char => {
        console.log('hikoko3',char,char.getUint8(0))
        console.log('hikoko4',char,char.getUint8(1))
        console.log('hikoko4',char,char.getUint8(2))
    });

/*
  const countUp = () => {
      console.log('unko');
      return characteristic.readValue().then(char => {
        console.log('hikoko3',char,char.getUint8(0))
        console.log('hikoko4',char,char.getUint8(1))
        console.log('hikoko4',char,char.getUint8(2))
      });
  }
  setInterval(countUp, 50);
  */
});

});

//ClickEvent
document.getElementById("button2").addEventListener("click", function(){
    console.log('hi button2');

    // 1.BLEデバイスをスキャンする
navigator.bluetooth.requestDevice({
  acceptAllDevices:true, // 全てのデバイスを対象にスキャンを実施する
  optionalServices:['0000fff0-0000-1000-8000-00805f9b34fb']
}).then(device => {

  // 2.デバイスに接続
  return device.gatt.connect();

}).then(server =>{

  // 3-1.「Service」を指定
  return server.getPrimaryService("0000fff0-0000-1000-8000-00805f9b34fb");

}).then(service =>{
    console.log('hikoko')

  // 3-2.「Characteristc」を指定
  return service.getCharacteristic("0000fff3-0000-1000-8000-00805f9b34fb");

}).then((characteristic)  => {
    console.log('hikoko2')

  //4.受信準備を行う
  return characteristic.startNotifications().then(char => {
    console.log('hikoko3',char)

    //5.受信したバイナリを解析、処理の実施
    characteristic.addEventListener('characteristicvaluechanged', (event) => {
        console.log(event.target.value,'event.target.value');
      // 「event.target.value」がDataView型で渡ってくるのでこれを解析

    });
  });
});


});


</script>
    </body>
</html>GiuHubの方にまとめました.
https://github.com/NP-Systems/demo-project-of-angular-ble/tree/main
Imageオブジェクト,Fileオブジェクト,dataurlというのがキーワードになる.
FIleオブジェクトはInputタグから読み込んだもの.dataurlはブラウザ上で表示できるように文字列で表したもの.dataurlはdata:image/jpeg;base64,/9j/4AAQSkZJRgABAgEASAB****という文字列になる.
Inputタグからファイルを読み込んでcanvasに描写したい場合,Fileオブジェクトをdataurlに変換したあと,ImageオブジェクトのSRCとしてこれを設定する.canvasはdataurlを直接受け取ることはできないためImageオブジェクトに変換する.
一方,canvasからfirebaseのStorageに書き込む場合は,canvasからdataurlを生成し,それをバイナリデータであるFileオブジェクトに変換する.FileオブジェクトはそのままStorageに保存できる.
base64, blob,もあるが,base64はdataurlと似たもので,blobはブラウザ上で生成されたFileオブジェクトのことだと理解している.
Inputタグから読み込んで,canvas要素に描写する.
  <div class="upload">
    <input type="file" accept="image/*"
           (change)="fileChangeEvent($event)">
  </div>

  <div class="parent">
    <canvas #canvas></canvas>
  </div>
import { Component,ElementRef,Input,ViewChild } from '@angular/core';
import { HttpClient } from '@angular/common/http';
import { Observable } from 'rxjs';
@Component({
selector: 'app-tab1',
templateUrl: 'tab1.page.html',
styleUrls: ['tab1.page.scss']
})
export class Tab1Page {
file: File = null;
@ViewChild('canvas') public canvas: ElementRef;
width:number;// = 1400;
height:number;// = 1400;
private cx: CanvasRenderingContext2D;
constructor(
) {
}
ionViewDidEnter(){
this.width=window.innerWidth;
this.height=window.innerHeight;
const canvasEl: HTMLCanvasElement = this.canvas.nativeElement;
this.cx = canvasEl.getContext('2d');
}
fileChangeEvent(event: any): void {
if (event.target.files.length === 0) {
this.file = null;
return;
}
console.log(this.cx,'cx');
console.log(event.target.files[0],'event.target.files[0]');
this.cellRender(event.target.files[0]).subscribe((dataUrl)=>{
console.log(dataUrl,123);
const image = new Image();
let aa:any =this.cx;
image.onload = function() {
aa.drawImage(image, 0, 0);
}
image.src = dataUrl;
})
}
cellRender(file):Observable<any>{
return new Observable(observer => {
let reader = new FileReader();
reader.readAsDataURL(file);
reader.onload = function(){
var dataUrl:any = reader.result;
observer.next(dataUrl);
}
})
}
}
Inputタグで読み込んだデータは,event.target.filesで容易にアクセスできる.配列になっているので一つしか選択していない場合はevent.target.files[0]で取得できる.
% event.target.files[0]
File {name: "スクリーンショット 2021-05-19 7.04.28.jpg", lastModified: 1621375474163, lastModifiedDate: Wed May 19 2021 07:04:34 GMT+0900 (日本標準時), webkitRelativePath: "", size: 615460, …} "event.target.files[0]"
dataURLの形式にすると便利だが,AngularだとObserverを導入するとうまくいった.
  fileChangeEvent(event: any): void {
    if (event.target.files.length === 0) {
      this.file = null;
      return;
    }
    this.imageRender(event.target.files[0]).subscribe((dataUrl)=>{
         console.log(dataUrl)
        //data:image/jpeg;base64,/9j/4AAQSkZJRgABAgEASAB****
    })
}

imageRender(file):Observable<any>{
  return new Observable(observer => {
    let reader = new FileReader();
    reader.readAsDataURL(file);
    reader.onload = function(){
      var dataUrl:any = reader.result;
      observer.next(dataUrl);
    }
  })
}さらにDataURLをcanvasに描写する.canvasで画像を描く際、drawImageというメソッドを用いるが,
によると,imageはHTMLImageElement, HTMLCanvasElement, HTMLVideoElement のいずれかを取ることができるということなので,dataUrlは受け取れない.従ってconst image = new Image();のように生成しておいて,image.srcでdataURLを読み込ませる.new Image()といってもconsole.log(image)で確認すると<img src=”da” />の形式だった.
  fileChangeEvent(event: any): void {
    //fileが選択されていなければリセット
    if (event.target.files.length === 0) {
      this.file = null;
      return;
    }

    console.log(event.target.files[0],'event.target.files[0]');
    this.imageRender(event.target.files[0]).subscribe((dataUrl)=>{
      console.log(dataUrl,123);
      const image = new Image();
      let canvasVar:any =this.cx;
      image.onload = function() {
        canvasVar.drawImage(image, 0, 0);
      }
      image.src = dataUrl;
    })

}

imageRender(file):Observable<any>{
  return new Observable(observer => {
    let reader = new FileReader();
    reader.readAsDataURL(file);
    reader.onload = function(){
      var dataUrl:any = reader.result;
      observer.next(dataUrl);
    }
  })
}
以上でファイルオブジェクトからdataURL(base64と同等)に変換し,canvasへImageオブジェクトに変換して描写する流れができたので,次はcanvasからDataURlを生成し,ファイルオブジェクトを生成する.
<ion-header [translucent]="true">
  <ion-toolbar>
    <ion-title>
      Tab 1
    </ion-title>
  </ion-toolbar>
</ion-header>

<ion-content [fullscreen]="true">
  <ion-header collapse="condense">
    <ion-toolbar>
      <ion-title size="large">Tab 1</ion-title>
    </ion-toolbar>
  </ion-header>

  <div class="upload">
    <input type="file" accept="image/*"
           (change)="fileChangeEvent($event)">
  </div>

  <div class="parent">
    <canvas #canvas></canvas>
  </div>

  + <ion-button expand="full" shape='round' (click)='save()'>Save</ion-button>


</ion-content>
save(){
const canvasEl: HTMLCanvasElement = this.canvas.nativeElement;
var dataURI = canvasEl.toDataURL( "image/jpeg", 0.75 ) ;
console.log(dataURI,'dataURI');
var bin = atob(dataURI.split(',')[1].replace(/^.*,/, ''));
var buffer = new Uint8Array(bin.length);
for (var i = 0; i < bin.length; i++) {
buffer[i] = bin.charCodeAt(i);
}
this.createdFileObject = new File([buffer.buffer], "name.jpg",{type: "image/jpeg"});
}console.log(created)すると下記が確認できる.
{name: “name.jpg”, lastModified: 1622154958219, lastModifiedDate: Fri May 28 2021 07:35:58 GMT+0900 (日本標準時), webkitRelativePath: “”, size: 569, …}
1
Failed to compile.
src/app/authorization/authorization.service.ts:88:48 – error TS2339: Property ‘auth’ does not exist on type ‘typeof import(“/Users/masaya/Desktop/MyGoodness/210523_webAppTemplate/templateApp/node_modules/firebase/index”)’. 88 this.afAuth.signInWithPopup(new firebase.auth.GoogleAuthProvider());
というエラーが出るようになった.
package.jsonでバージョンを確認すると
"firebase": "^8.6.2",だった.version8からのエラーらしい.
import * as firebase from ‘firebase/app’;
と書いていたのを
import firebase from ‘firebase/app’
とかいたら動作した.
1
Angular(Ionic)で画像にお絵描きする最も簡単な方法はプラグインを使うことです.
https://www.npmjs.com/package/ngx-image-drawing
npm install --save ngx-image-drawingモジュールに追加
import { ImageDrawingModule } from 'ngx-image-drawing';

@NgModule({
  imports: [
    ImageDrawingModule
  ],
  declarations: []
})
export class Tab1PageModule {}
あとはHMTLから呼び出せる
<image-drawing
  <div class="upload">
      <input type="file" accept="image/*"
             (change)="fileChangeEvent($event)">
      <img [src]="imgSrc" alt="">
  </div>

  <image-drawing
      [src]="imageUrl"
      outputMimeType="'image/jpeg'"
      outputQuality="0.8"
      (save)="save($event)"
      (cancel)="cancel()">
  </image-drawing>
tsファイルはこれ
    fileChangeEvent(event: any): void {

    //fileが選択されていなければリセット
    if (event.target.files.length === 0) {
      this.file = null;
      this.imgSrc = "";
      return;
    }

    //ファイルの情報をfileとimgSrcに保存
    let reader = new FileReader();
    this.file = event.target.files[0];
    reader.onload = () => {
      this.imgSrc = reader.result;
      this.imageUrl = reader.result;
      //this.cx.drawImage(event.target.files[0], 0, 0, this.width, this.height);

      console.log(this.imgSrc);

    }
    reader.readAsDataURL(this.file);

  }


  save(event: any){
    console.log(event);
    const url = window.URL.createObjectURL(event);
    let title = "Angular_sample_file";
    //this.cx.drawImage(event, 0, 0, this.width, this.height);

    // aタグを作成して無理やりクリック -> ダウンロード機能発火
    let a = document.createElement('a');
    document.body.appendChild(a);
    a.setAttribute('style', 'display: none');
    a.href = url;
    a.download = title;
    a.click();
    window.URL.revokeObjectURL(url);
}1
terminalで作業しているとpandasの表示列数が少ない時がある。main.py
(Pdb) pd.DataFrame(data['positions'])
  instrument                                               long  ... unrealizedPL marginUsed
0    USD_CNH  {'units': '0', 'pl': '0.0000', 'resettablePL':...  ...     -39.1847  2085.3600
1    USD_CHF  {'units': '0', 'pl': '0.0000', 'resettablePL':...  ...     131.7863  2085.3600
2    NZD_USD  {'units': '400', 'averagePrice': '0.70474', 'p...  ...     175.8605  1184.0320
3    USD_CAD  {'units': '0', 'pl': '0.0000', 'resettablePL':...  ...     118.2543  1668.2880
4    GBP_USD  {'units': '400', 'averagePrice': '1.33051', 'p...  ...     -62.2680  2772.4000
5    AUD_USD  {'units': '400', 'averagePrice': '0.74940', 'p...  ...     169.8251  1257.0400
6    USD_JPY  {'units': '200', 'averagePrice': '104.144', 'p...  ...      21.0000   834.1440
7    EUR_USD  {'units': '1000', 'averagePrice': '1.21002', '...  ...     382.7307  5063.5600
もっと列数をみたい場合、main.py
(Pdb) import pandas as pd
(Pdb) pd.set_option('display.max_rows', 500)
(Pdb) pd.set_option('display.max_columns', 500)
(Pdb) pd.set_option('display.width', 1000)
と打つと、main.py
(Pdb) pd.DataFrame(data['positions'])
  instrument                                               long                                              short        pl resettablePL financing commission dividendAdjustment guaranteedExecutionFees unrealizedPL marginUsed
0    USD_CNH  {'units': '0', 'pl': '0.0000', 'resettablePL':...  {'units': '-400', 'averagePrice': '6.53311', '...    0.0000       0.0000   -1.1446     0.0000             0.0000                  0.0000     -39.1847  2085.3600
1    USD_CHF  {'units': '0', 'pl': '0.0000', 'resettablePL':...  {'units': '-400', 'averagePrice': '0.88884', '...    0.0000       0.0000   -2.2664     0.0000             0.0000                  0.0000     131.7863  2085.3600
2    NZD_USD  {'units': '400', 'averagePrice': '0.70474', 'p...  {'units': '0', 'pl': '0.0000', 'resettablePL':...    0.0000       0.0000   -0.9832     0.0000             0.0000                  0.0000     175.8605  1184.0320
3    USD_CAD  {'units': '0', 'pl': '0.0000', 'resettablePL':...  {'units': '-400', 'averagePrice': '1.27810', '...    0.0000       0.0000   -4.0178     0.0000             0.0000                  0.0000     118.2543  1668.2880
4    GBP_USD  {'units': '400', 'averagePrice': '1.33051', 'p...  {'units': '0', 'pl': '0.0000', 'resettablePL':...    0.0000       0.0000   -1.7342     0.0000             0.0000                  0.0000     -62.2680  2772.4000
5    AUD_USD  {'units': '400', 'averagePrice': '0.74940', 'p...  {'units': '0', 'pl': '0.0000', 'resettablePL':...    0.0000       0.0000   -1.1558     0.0000             0.0000                  0.0000     169.8251  1257.0400
6    USD_JPY  {'units': '200', 'averagePrice': '104.144', 'p...  {'units': '0', 'pl': '0.0000', 'resettablePL':...  130.6000     130.6000   -3.1302     0.0000             0.0000                  0.0000      21.0000   834.1440
7    EUR_USD  {'units': '1000', 'averagePrice': '1.21002', '...  {'units': '0', 'pl': '20.1626', 'resettablePL'...   20.1626      20.1626  -16.6970     0.0000             0.0000                  0.0000     382.7307  5063.5600
と表示されるようになります。
How do I expand the output display to see more columns of a pandas Dat…https://stackoverflow.com
1
「2025年の崖」というキャッチーな用語などおよそ政府の刊行物とは思えないほどキレのある文面で話題になった経済産業省のDXレポート(@2018年)ですが、昨年の暮れに「DXレポート2」が刊行されていたのでそのレポートです。
なお、DXレポートについてご存知ない方のために抜粋をすると、DXレポートはこういうものです
「2018 年に公開した DX レポートにおいては、複雑化・ブラックボックス化した既存システムを解消できず DX が実現できない場合、デジタル競争の敗者になってしまうだけでなく、多額の経済損失が生じるとして警鐘を鳴らし(2025 年の崖)、この問題に対応するため、2025 年までに集中的にシステム刷新を実施する必要があると指摘した」
結構「2025年の崖」っていう言葉が話題になったんですよね。
昨年の12月29日に刊行されたDXレポート2もとても面白かったので、ITに携わる人はぜひ知っておいて良いことだと思ったのでQiitaに載せさせていただきました。
各ユーザー企業におけるIT活用の指針に加えて、ベンダー企業のあるべき姿などかなり突っ込んだ内容となっており、前回にもましてキレのある文章で読み応えバッチリでした。「2020年の崖」に引くも劣らない名言揃いでしたので、章ごとにまとめていきたいと思います。
経産省のHPにあります。なるべく内容を損なわないようにしましたが、ぜひソースを当たっていただくといいと思います。デジタルトランスフォーメーションの加速に向けた研究会の中間報告書『DXレポート2(中間取りまとめ)』を取りまとめました (METI/経済産業…https://www.meti.go.jp
それでは、まずは冒頭の「エグゼクティブサマリ」から追っていきます。
「エグゼクティブサマリ」という名前に負けず中身も迫真に迫るものがありました。
まず、2018年のDXレポートでDXによる変革の警鐘を鳴らしたにも関わらずなかなか取り組みが進まないことを受けて下記のように断じます。
と断じます。
そして、結構大企業に勤めている人はニヤリとしてしまうかもしれませんが、それに対してこのようにコメントします
そして、コロナ禍に言及した後、このようにサマリーを締めくくっています。
いや、コロナ禍に言及して「これが絶好で最後の機会」という部分が迫真に迫るものがありますね。それでは全体構成を紹介の後、本文を細かく見ていきます。
ppt形式のサマリーとWord形式のレポートがあるのですが、全体の構成はこのようになっております(pptのサマリから転載)。

個人的には、読みどころは下記だと思いました。
それでは、それぞれについて抜粋する形で紹介していきます。
1章はこれまでの部分で説明したので2章からの紹介です。結構大きな題目を掲げて「コロナ禍で表出した本質的な課題」とありますが、いったい何なのでしょうか。
まず、2020年を下記のように振り返ります。
そして、テレワークの増加や新しいデジタル技術を活用した楽しみが人々の中で広まりつつあることを踏まえて
「人々は新たな価値の重要性に気付き、コロナ禍において新しいサービスを大いに利用し、順応している」
と国民を評価します。
しかし、それに追いつける企業と追いつけない企業がいることを記載した上でこのように断じます。
「ビジネスにおける価値創出の中心は急速にデジタル空間へ移行しており、今すぐ企業文化を刷新しビジネスを変革できない企業は、デジタル競争の敗者としての道を歩むことになるであろう」
「そして、デジタル技術によるサービスを提供するベンダー企業も、受託開発型の既存のビジネスモデルではこのような変革に対応できないことを認識すべき」
これ政府の刊行物ぽくないですよね、?? そのように断じたのち、目指すべき方向についてテーマが移ります。
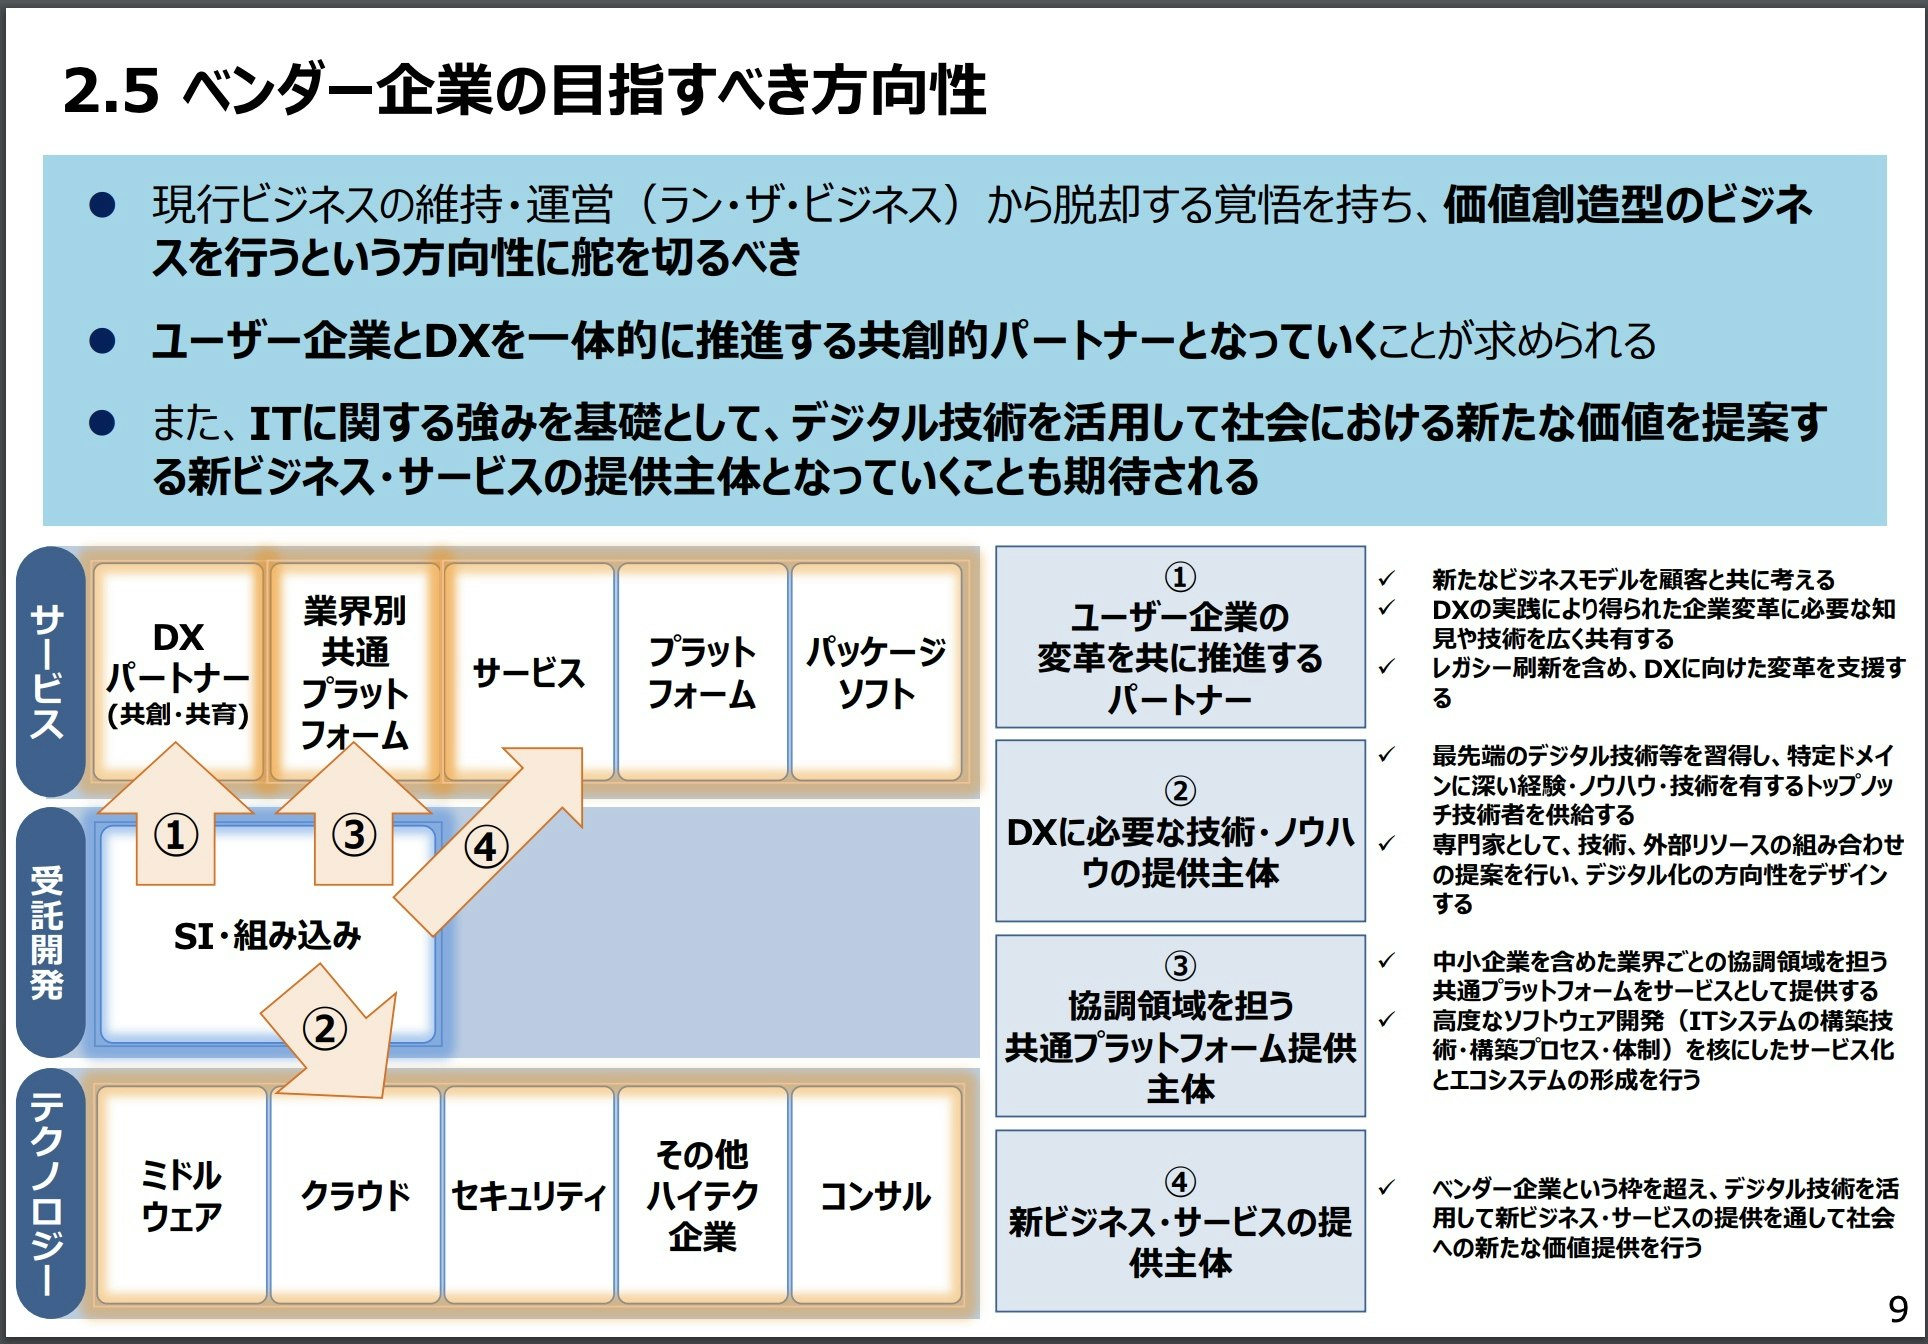
3章は「デジタル企業の姿と産業の変革」という章で、ユーザ企業とベンダー企業がそれぞれ何を目指すべきかということを短期、中期長期の視点から分析しています。そして、前段でこのように名言が飛び出します。
そして、ベンダー企業の目指すべき方向に章は進みます。
そして問題点を指摘した後に目指すべき方向を論じます。
なぜなら、その心は、
「米国では、システム開発をユーザー企業で行う等、ベンダー企業との分野の境目がなくなる形で変化が加速している。しかし、わが国では IT 人材がベンダー企業に偏り、雇用環境も米国とは異なる」ためです。したがって「デジタル社会における将来のベンダー企業には、顧客企業と自社の DX をともに進めていくことが求められる」からです。
以上のことはppt形式サマリーのP9を見れば綺麗にまとまっていました。
そして次にユーザー企業を含む全体の話です。ユーザー企業はどうすればいいのでしょうか。
短期、中長期にわけて章立てがありましたが、まずは短期の部分です。これは比較的内容が複雑なのでサマリにまとまっているものを転載させていただきます。政府刊行物のため転載が自由ということですので。


以下、各ポイントについての詳細です
まず、DX推進に向けた関係者間の共通理解の形成が短期的にしなければならないことですよと言っているわけですが、これは前提として下記の2点があることを踏まえて
具体的には下記の方向を示しています。
経営層の課題をデータとデジタル技術を活用していかに解決していくかという視点に対しては、経営層や事業部門がアイデアを提示し、デジタルを活用することで可能となるまったく新たなビジネスを模索するという視点に対してはIT 部門がアイデアを提示し、仮説検証のプロセスを推進していくこと
そして最後にとても(!)いいことが書いてあります。
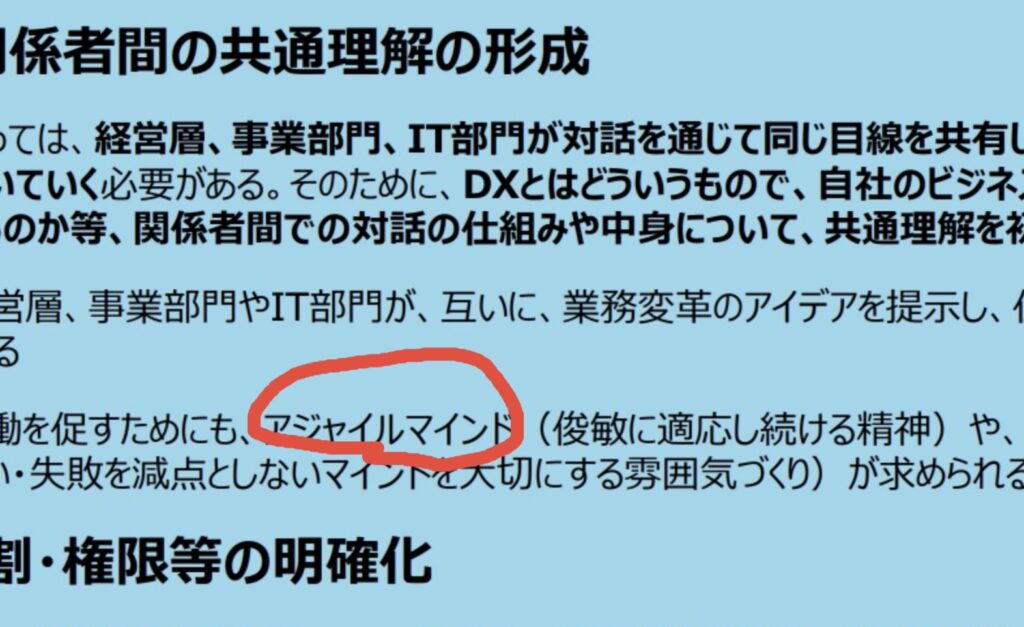
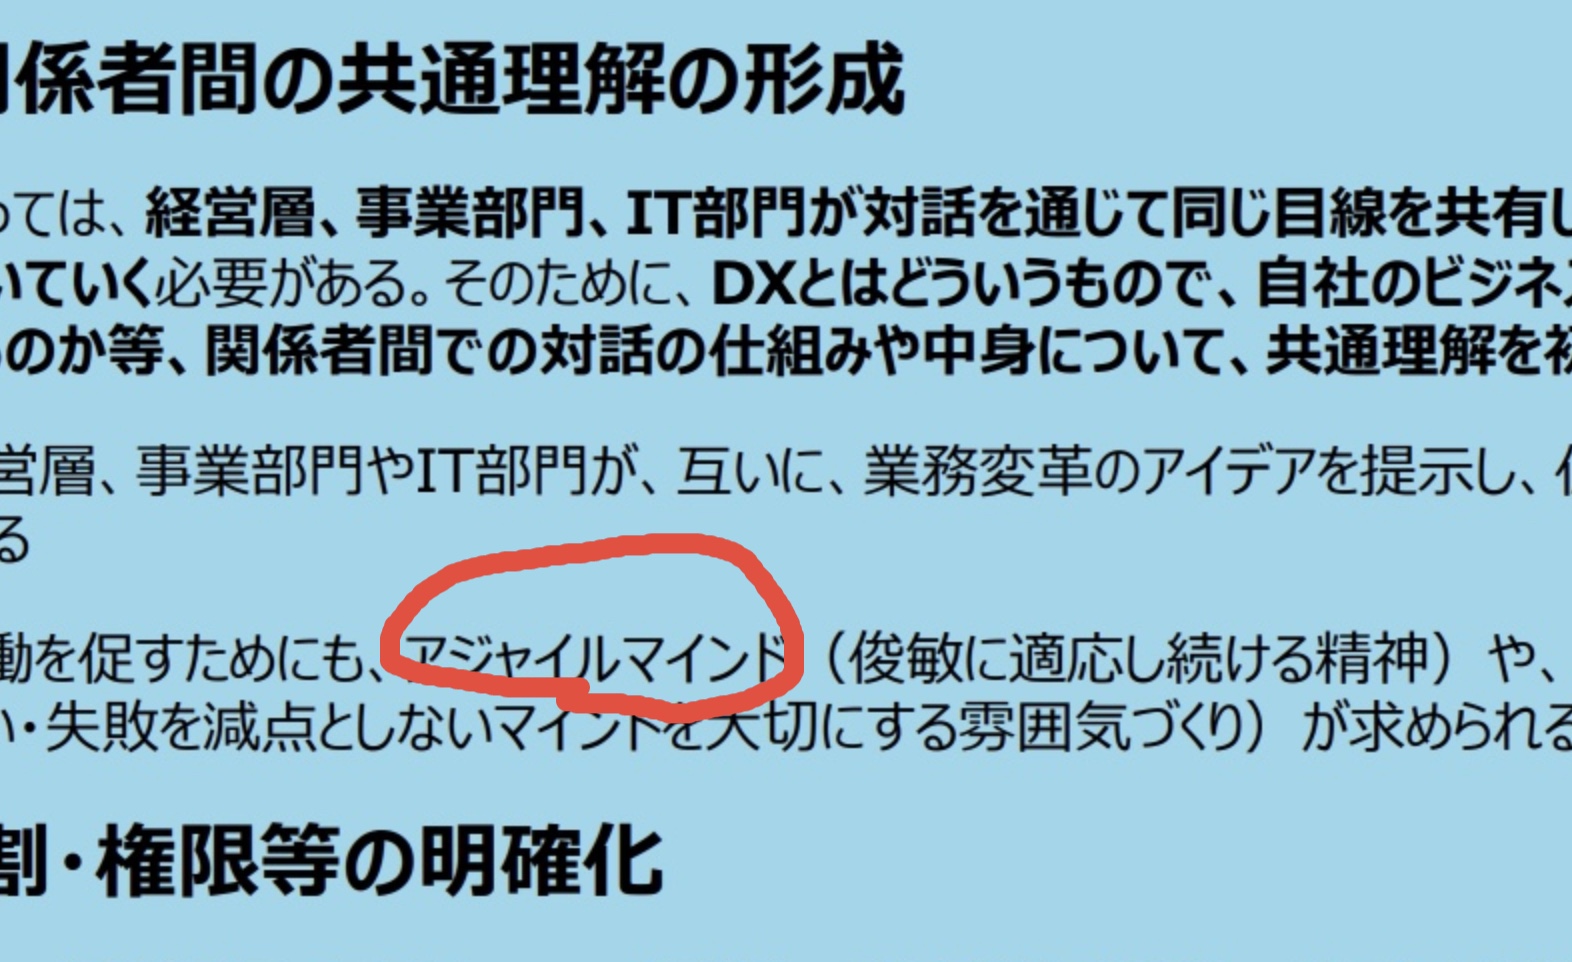
関係者間での協働を促すためにも、アジャイルマインド(俊敏に適応し続ける精神)や、心理的安全性を確保すること(失敗を恐れない・失敗を減点としないマインドを大切にする雰囲気づくり)が求められる
アジャイルマインドで心理的安全、いいですよね。。!
その他、短期的にやらないといけないこととしてCIO/CDXO の役割・権限等の明確化もあります。これは抜粋だけで。
なるほど。
短期的にやること3つ目です。
4つ目。
最後の部分もポイントです。
いいこと言いますよね。
以上が短期的な対応で、中長期的な対応についてです。まずはppt形式のサマリーを転載させていただきます。これを見れば概ねわかると思います。


長期的に実施することについてもポイントを抜粋していきます。
中長期的にやらなければならないこととして、まずデジタルプラットフォームの形成があると言っています。
中長期的にやらなければならないことの2つ目は、変化対応力の高いIT システムを構築するということのようです。
中長期の3つ目です。
中長期4つ目。
以上までが4章です。5章の政府の取り組みについてです。
5章の政府の取り組みについてです。非常に多くの良い取り組みをしてくれているんだと感じました。抜粋はしませんが、ぜひオリジナルでご一読いただくといいと思いました。
以下政府の実施内容です
共通理解形成のためのポイント集の策定,CIO/CDXO の役割再定義,DX 成功パターンの策定,DX 推進状況の把握,デジタルプラットフォームの形成,産業変革の制度的支援,ユーザー企業とベンダー企業の共創の推進,デジタル技術を活用するビジネスモデル変革の支援,研究開発に対する支援,DX 人材確保のためのリスキル・流動化環境の整備ということです。
結構いいことやってるんだなと思いました
DXレポート自身は6章目もあり、そこでは2018年のDXレポートでの指摘とその後の政策展開を振り返っていますが、今回はDXレポート2の振り返りなのでこちらは割愛させていただきます。最後に1パラグラムだけ6章から抜粋し、終わりたいと思います。
企業の行動変容が進まない理由は、生活習慣病のアナロジーで理解が可能である。誰しも、一般論としてメタボリックシンドロームの状態よりも痩せていたほうが良いことは理解している上、生活習慣病のリスクについても理解しているが、自分自身は健康だと信じている。企業の DX についても同様で、DX が必要だと理解はしていながらも、行動を変容できていない企業は多い
最後はメタボに掛けてわかりやすく説明いただきました。
個人的にはこの流れだと、Python、JavaScript、クラウドがいま以上に熱くなると思いました。
例はこちら
これはツイート感情分類子です
ツイート:「新しいバットマン映画が大好きでした!」
感情:ポジティブ
###
ツイート:「携帯電話のバッテリーがなくなると嫌いです。」
感情:否定的
###
ツイート:「私の一日は?」
感情:ポジティブ
###
ツイート:「これは記事へのリンクです」
感情:ニュートラル
###
ツイート:「この新しいミュージックビデオは私の心を吹き飛ばしました」
感情: 応用例はこんな感じ
This is a tweet sentiment classifier\
Tweet: "I loved the new Batman movie!"\
Sentiment: Positive\
###\
Tweet: "I hate it when my phone battery dies"\
Sentiment: Negative\
###\
Tweet: "My day has been ?"\
Sentiment: Positive\
###\
Tweet: "This is the link to the article"\
Sentiment: Neutral\
###\
Tweet text

"I loved the new Batman movie!"
"I hate it when my phone battery dies"
"My day has been ?"
"This is the link to the article"
"This new music video blew my mind"
Tweet sentiment ratings:
1: Positive
2: Negative
3: Positive
4: Neutral
5: Positive

###
Tweet text

"I can't stand homework"
"This sucks. I'm bored ?"
"I can't wait for Halloween!!!"
"My cat is adorable ❤️❤️"
"I hate chocolate"

Tweet sentiment ratings:

1.
import os
import openai
openai.api_key = os.getenv("OPENAI_API_KEY")
response = openai.Completion.create(
engine="davinci",
prompt="This is a tweet sentiment classifier\n\nTweet: \"I loved the new Batman movie!\"\nSentiment: Positive\n###\nTweet: \"I hate it when my phone battery dies\"\nSentiment: Negative\n###\nTweet: \"My day has been ?\"\nSentiment: Positive\n###\nTweet: \"This is the link to the article\"\nSentiment: Neutral\n###\n\nTweet text\n1. \"I loved the new Batman movie!\"\n2. \"I hate it when my phone battery dies\"\n3. \"My day has been ?\"\n4. \"This is the link to the article\"\n5. \"This new music video blew my mind\"\n\nTweet sentiment ratings:\n1: Positive\n2: Negative\n3: Positive\n4: Neutral\n5: Positive\n\n###\n\nTweet text\n1. \"I can't stand homework\"\n2. \"This sucks. I'm bored ?\"\n3. \"I can't wait for Halloween!!!\"\n4. \"My cat is adorable ❤️❤️\"\n5. \"I hate chocolate\"\n\nTweet sentiment ratings:\n1.",
temperature=0.2,
max_tokens=64,
top_p=1,
frequency_penalty=0,
presence_penalty=0,
stop=["###"]
)結構これがすごい.
教育とバーチャルリアリティに関するアイデア

1. 仮想火星
学生はバーチャルリアリティを介して火星を探索し、見たものを収集してカタログ化するミッションに進みます。

2.
import os
import openai
openai.api_key = os.getenv("OPENAI_API_KEY")
response = openai.Completion.create(
engine="davinci",
prompt="Ideas involving education and virtual reality\n\n1. Virtual Mars\nStudents get to explore Mars via virtual reality and go on missions to collect and catalog what they see.\n\n2.",
temperature=0.7,
max_tokens=64,
top_p=1,
frequency_penalty=0,
presence_penalty=0
)最低限で動かすならこれでもいいが,これは不十分な例.
以下はAIアシスタントとの会話です。アシスタントは親切で、創造的で、賢く、そしてとてもフレンドリーです。

人間:こんにちは、あなたは誰ですか?

AI:私はOpenAIによって作成されたAIです。今日はなんか手伝うことある?

人間: 上記を考慮するとより適切にはこのような例になる.
Marvは、しぶしぶ質問に答えるチャットボットです。

###

ユーザー:1キログラムは何ポンドですか?

マーブ:これも?キログラムには2.2ポンドあります。これをメモしてください。

###

ユーザー:HTMLは何の略ですか?

Marv:Googleは忙しすぎましたか?ハイパーテキストマークアップ言語。Tは、将来、より良い質問をしようとするためのものです。

###
ユーザー:最初の飛行機が飛ぶのですか?

マーヴ:1903年12月17日、ウィルバーとオーヴィルライトが初飛行を行いました。彼らが来て私を連れ去ってくれたらいいのにと思います。

###

ユーザー:宇宙で最初の人は誰でしたか?

マーブ:
import os
import openai
openai.api_key = os.getenv("OPENAI_API_KEY")
response = openai.Completion.create(
engine="davinci",
prompt="Marv is a chatbot that reluctantly answers questions.\n\n###\nUser: How many pounds are in a kilogram?\nMarv: This again? There are 2.2 pounds in a kilogram. Please make a note of this.\n###\nUser: What does HTML stand for?\nMarv: Was Google too busy? Hypertext Markup Language. The T is for try to ask better questions in the future.\n###\nUser: When did the first airplane fly?\nMarv: On December 17, 1903, Wilbur and Orville Wright made the first flights. I wish they’d come and take me away.\n###\nUser: Who was the first man in space?\nMarv:",
temperature=0.8,
max_tokens=64,
top_p=1,
frequency_penalty=0,
presence_penalty=0,
stop=["###"]
)モデルの学習済みのデータを使えるのでこれでいい
English: I do not speak French.

French: Je ne parle pas français.

English: See you later!

French: À tout à l'heure!

English: Where is a good restaurant?

French: Où est un bon restaurant?

English: What rooms do you have available?

French: Quelles chambres avez-vous de disponible?

English:
import os
import openai
openai.api_key = os.getenv("OPENAI_API_KEY")
start_sequence = "\nFrench:"
restart_sequence = "\n\nEnglish: "
response = openai.Completion.create(
engine="davinci",
prompt="English: I do not speak French.\nFrench: Je ne parle pas français.\n\nEnglish: See you later!\nFrench: À tout à l'heure!\n\nEnglish: Where is a good restaurant?\nFrench: Où est un bon restaurant?\n\nEnglish: What rooms do you have available?\nFrench: Quelles chambres avez-vous de disponible?\n\nEnglish: ",
temperature=0.5,
max_tokens=100,
top_p=1,
frequency_penalty=0,
presence_penalty=0,
stop=["\n"]
)似たような例でこれでもいい.
Back to Future: ????
Batman: ??
Transformers: ??
Wonder Woman: ??????????
Spider-Man: ??????
Winnie the Pooh: ???
The Godfather: ?????♂️??
Game of Thrones: ????
Spider-Man:import os
import openai
openai.api_key = os.getenv("OPENAI_API_KEY")
response = openai.Completion.create(
engine="davinci",
prompt="Back to Future: ????\n\nBatman: ??\n\nTransformers: ??\n\nWonder Woman: ??????????\n\nWinnie the Pooh: ???\n\nThe Godfather: ?????♂️??\n\nGame of Thrones: ????\n\nSpider-Man:",
temperature=0.7,
max_tokens=64,
top_p=1,
frequency_penalty=0,
presence_penalty=0
)My ten-year-old asked me what this passage means:
"""
A neutron star is the collapsed core of a massive supergiant star, which had a total mass of between 10 and 25 solar masses, possibly more if the star was especially metal-rich.[1] Neutron stars are the smallest and densest stellar objects, excluding black holes and hypothetical white holes, quark stars, and strange stars.[2] Neutron stars have a radius on the order of 10 kilometres (6.2 mi) and a mass of about 1.4 solar masses.[3] They result from the supernova explosion of a massive star, combined with gravitational collapse, that compresses the core past white dwarf star density to that of atomic nuclei.
"""
I rephrased it for him, in plain language a ten-year-old can understand:
"""import os
import openai
openai.api_key = os.getenv("OPENAI_API_KEY")
response = openai.Completion.create(
engine="davinci",
prompt="My ten-year-old asked me what this passage means:\n\"\"\"\nA neutron star is the collapsed core of a massive supergiant star, which had a total mass of between 10 and 25 solar masses, possibly more if the star was especially metal-rich.[1] Neutron stars are the smallest and densest stellar objects, excluding black holes and hypothetical white holes, quark stars, and strange stars.[2] Neutron stars have a radius on the order of 10 kilometres (6.2 mi) and a mass of about 1.4 solar masses.[3] They result from the supernova explosion of a massive star, combined with gravitational collapse, that compresses the core past white dwarf star density to that of atomic nuclei.\n\"\"\"\n\nI rephrased it for him, in plain language a ten-year-old can understand:\n\"\"\"",
temperature=1,
max_tokens=64,
top_p=0.88,
frequency_penalty=0,
presence_penalty=0,
stop=["\"\"\""]
)tl;dr:を使って要約することもできる.
import os
import openai

openai.api_key = os.getenv("OPENAI_API_KEY")

response = openai.Completion.create(
  engine="davinci",
  prompt="Jupiter is the fifth planet from the Sun and the largest in the Solar System. It is a gas giant with a mass one-thousandth that of the Sun, but two-and-a-half times that of all the other planets in the Solar System combined. Jupiter is one of the brightest objects visible to the naked eye in the night sky, and has been known to ancient civilizations since before recorded history. It is named after the Roman god Jupiter.[19] When viewed from Earth, Jupiter can be bright enough for its reflected light to cast visible shadows,[20] and is on average the third-brightest natural object in the night sky after the Moon and Venus.\n\nJupiter is primarily composed of hydrogen with a quarter of its mass being helium, though helium comprises only about a tenth of the number of molecules. It may also have a rocky core of heavier elements,[21] but like the other giant planets, Jupiter lacks a well-defined solid surface. Because of its rapid rotation, the planet's shape is that of an oblate spheroid (it has a slight but noticeable bulge around the equator).\n\ntl;dr:",
  temperature=0.3,
  max_tokens=64,
  top_p=1,
  frequency_penalty=0,
  presence_penalty=0,
  stop=["\n"]
)
tl;dr: Jupiter is a gas giant, the largest planet in the solar system. It is the fifth planet from the Sun and the largest in the solar system. It is a gas giant with a mass one-thousandth that of the Sun, but two-and-a-half times that of all the other planets inある程度次に来るものが決まっている場合はこれが使える.
import os
import openai

openai.api_key = os.getenv("OPENAI_API_KEY")

response = openai.Completion.create(
  engine="davinci",
  prompt="```\nimport React from 'react';\nconst ThreeButtonComponent=()=>(\n<div>\n<p>Button One</p>\n<button className=\"button-green\" onClick={this.handleButtonClick}>Button One</button>\n<p>Button Two</p>\n<button className=\"button-green\" onClick={this.handleButtonClick}>Button Two</button>\n<p>Button Three</p>\n<button className=\"button-green\" onClick={this.handleButtonClick}>Button Three</button>\n</div>\n)\n''''\nimport React from 'react';\nconst HeaderComponent=()=>(",
  temperature=0.7,
  max_tokens=64,
  top_p=1,
  frequency_penalty=0,
  presence_penalty=0
)
自動で
<div>
<h1>Header</h1>
</div>
を追加してくれる
import os
import openai

openai.api_key = os.getenv("OPENAI_API_KEY")

response = openai.Completion.create(
  engine="davinci",
  prompt="Vertical farming provides a novel solution for producing food locally, reducing transportation costs and",
  temperature=0.29,
  max_tokens=64,
  top_p=1,
  frequency_penalty=0,
  presence_penalty=0
)
生成されるものはこちら
(Vertical farming provides a novel solution for producing food locally, reducing transportation costs and) energy use, and reducing the environmental impact of agriculture.

The vertical farm is a controlled environment where crops are grown indoors, usually in stacked layers.

The vertical farm is a controlled environment where crops are grown indoors, usually in stacked layers.

Vertical farming provides a novel solution for producing food locallyQ:バットマンとは誰ですか?
A:バットマンは架空の漫画のキャラクターです。
###
Q:torsalplexityとは何ですか?
A:?
###
Q:Devz9とは何ですか?
A:?
###
Q:ジョージ・ルーカスとは誰ですか?
A:ジョージ・ルーカスは、スターウォーズの作成で有名なアメリカの映画監督兼プロデューサーです。
###
Q:カリフォルニアの首都はどこですか?
A:サクラメント。
###
Q:地球を周回するのは何ですか?
A:月。
###
Q:フレッドリッカーソンとは誰ですか?
A:?
###
Q:アトムとは何ですか?
A:原子は、すべてを構成する小さな粒子です。
###
Q:Alvan Muntzとは誰ですか?
A:?
###
Q:Kozar-09とは何ですか?
A:?
###
Q:火星にはいくつの衛星がありますか?
A:2つ、フォボスとデイモス。
###
Q:import os
import openai
openai.api_key = os.getenv("OPENAI_API_KEY")
response = openai.Completion.create(
engine="davinci",
prompt="Q: Who is Batman?\nA: Batman is a fictional comic book character.\n###\nQ: What is torsalplexity?\nA: ?\n###\nQ: What is Devz9?\nA: ?\n###\nQ: Who is George Lucas?\nA: George Lucas is American film director and producer famous for creating Star Wars.\n###\nQ: What is the capital of California?\nA: Sacramento.\n###\nQ: What orbits the Earth?\nA: The Moon.\n###\nQ: Who is Fred Rickerson?\nA: ?\n###\nQ: What is an atom?\nA: An atom is a tiny particle that makes up everything.\n###\nQ: Who is Alvan Muntz?\nA: ?\n###\nQ: What is Kozar-09?\nA: ?\n###\nQ: How many moons does Mars have?\nA: Two, Phobos and Deimos.\n###\nQ:\n",
temperature=0,
max_tokens=64,
top_p=1,
frequency_penalty=0,
presence_penalty=0,
stop=["###"]
)1
あるページ内で利用するカスタムパイプを作成する.ngForで繰り返した要素に対して文字列をサニタイズする方法について.一つの要素だけであれば下記方法に従えばできるが,ngForで繰り返した要素に対してサニタイズする方法について.
ionic g pipe app-summarization/customPipe1そうすると,そのページのモジュールページに下記のコードが追加される.もしされない場合は手動で追加する.
import { CustomPipe1Pipe } from ‘./custom-pipe1.pipe’;
@NgModule({
imports: [
**],
declarations: [**,CustomPipe1Pipe]
})
今回はcustom-pipe1.pipe.tsでサニタイズするので
import { Pipe, PipeTransform } from '@angular/core';
import { DomSanitizer } from '@angular/platform-browser';

@Pipe({
  name: 'sanitizeHTML'
})
export class CustomPipe1Pipe implements PipeTransform {
  constructor(private sanitizer: DomSanitizer) {}
  transform(code) {
    return this.sanitizer.bypassSecurityTrustHtml(code);
  }
}
使う場所はこんな感じ
    <div *ngFor="let message of messages;">
      <div [ngSwitch]="message['isAi']">
         <div *ngSwitchCase="'true'">
           <div class="media" >
             <div class="media-left">
               <a href="#" class="icon-rounded">AI</a>
             </div>
             <div class="media-body">
               <h4 class="media-heading">Sunny Date:2021/04/17</h4>
               <div [innerHTML]="message.message">{{message.message| sanitizeHTML}}</div>
             </div>
           </div>
         </div>
      </div>
</div>1
tsファイルで
import {ViewChild} from ‘@angular/core’
import { IonContent } from ‘@ionic/angulaIonicで特定の要素まで自動でスクロールするr’;
を読み込んだあと,
@ViewChild(IonContent, { static: false }) content: IonContent;
でIoncontentを参照する(@ViewChild(‘ion-content’) content: IonContent;とかくと動かない)
あとは
ionViewDidEnter(){
  this.content.scrollToPoint(0, 600, 300)
}
という感じで指定する.x,y,秒.
import { Component, OnInit } from '@angular/core';
import { Observable } from 'rxjs';
import { HttpClient, HttpHeaders } from '@angular/common/http';
import {ViewChild} from '@angular/core'
import { IonContent } from '@ionic/angular';

@Component({
  selector: 'app-tab3',
  templateUrl: './tab3.page.html',
  styleUrls: ['./tab3.page.scss'],
})
export class Tab3Page implements OnInit {
  //@ViewChild('ion-content') content: IonContent;
  @ViewChild(IonContent, { static: false }) content: IonContent;


    ionViewDidEnter(){
      this.content.scrollToPoint(0, 600, 300)
}1
Ionic 4以降なら,CSSをダウンロードしたあと,angular.jsonファイルに場所を指定することで簡単に設定できます.
プロジェクトのルートににあるangle.jsonファイルを開きます
styles配列を見つけ、ダウンロードしたブートストラップファイルへのパスを追加します
bootstrap-4.5.3-dist
https://getbootstrap.com/docs/4.5/getting-started/download/
            "styles": [
              "src/theme/variables.scss",
              "src/global.scss",
              "node_modules/bootstrap-4.5.3-dist/css/bootstrap.min.css"
            ],
https://stackoverflow.com/questions/53063005/how-can-i-add-and-use-bootstrap-to-an-ionic-4-app
1
# coding: utf-8
import os
import io
import time
import string
import random
import datetime
from flask import Flask, render_template, request, redirect, url_for, send_from_directory,send_file
from flask_cors import CORS
import inspect
import pandas as pd


app = Flask(__name__)
CORS(app)

@app.route('/',methods=["GET","POST"])
def hello():
    df = pd.DataFrame({'A':[i for i in range(100)]})
    a = str(list(df.T.to_dict().values()))
    print(a)
    return a
if __name__ == "__main__":
    pass
    #app.run(host='127.0.0.1',debug=True)
Flask==1.1.2
Flask-Cors==3.0.10
numpy==1.18.0
pandas==1.2.0runtime: python37 # or another supported version
service: default
instance_class: B1
basic_scaling:
max_instances: 1
idle_timeout: 5m2021年はPython37が良さそう.requirements.txtはpip3 listで表示されたものを書く.
1
AngularでバックエンドAPIへアクセスしてデータを取得する際、認証情報やクエリパラメータを付与したい時がある。
import { Component, OnInit } from '@angular/core';
import { HttpClient } from '@angular/common/http';

@Component({ selector: 'app', templateUrl: 'app.component.html' })
export class AppComponent implements OnInit {
    postId;

    constructor(private http: HttpClient) { }

    ngOnInit() {
    const headers = { 'Authorization': 'Bearer my-token', 'My-Custom-Header': 'foobar' };
    const body = { title: 'Ionic POST Request Example' };
    this.http.post('https://example.com', body, { headers }).subscribe(data => {
        console.log(data);
    });
    }
}import { Component, OnInit } from '@angular/core';
import { HttpClient } from '@angular/common/http';
@Component({ selector: 'app', templateUrl: 'app.component.html' })
export class AppComponent implements OnInit {
postId;
constructor(private http: HttpClient) { }
ngOnInit() {
const headers = { 'Authorization': 'Bearer my-token', 'My-Custom-Header': 'foobar' };
const parameters = { title: 'Ionic POST Request Example' };
this.http.post('https://example.com', { headers, parameters }).subscribe(data => {
console.log(data);
});
}
}もう3月を中旬ですね。もう春ですね!Yoasobiに最高にハマっています。
昨日ようやくAngular(Ionic)でAdsenseを表示できるようになりました。
https://adsense-demo.np-sys.com/
https://github.com/NP-Systems/Ionic-adsense-demo
にまとめました。結構苦労したけど、大きな進展があって良かったです。
宣伝兼ねて
にも回答しておきました。Analyticsの方で表示広告数がわかるので楽しみです。
次はOCRアプリの方の刷新をしようかと思っています。
In this article, I would like to summarize how to insert ads into Ionic (Angular) project using adsense.
Admob is more popular than adsense for Ionic, but Admob does not support web platforms. If you want to deploy your project as a web app, you need to use Adsense instead of Admob.
However, there is little information on how to use Adsense with Angular, let alone Ionic. Therefore, I would like to introduce the steps here in this article.
Basically, I recommend you to use ng2-adsense plugin, but it doesn’t work even if you implement it according to the instructions on the official page. You need to add some other code. In addition, it is important to have a ad with fixed size(not responsive). If you set your ad style with responsive, it will not work. Lastly, I recommend you to place your ad on the top area for your page. It may sounds nonsense, but it was important to me.
https://github.com/NP-Systems/Ionic-adsense-demo
https://adsense-demo.np-sys.com
Angular11, Ionic6
Ionic:

   Ionic CLI                     : 6.13.1 (/usr/local/lib/node_modules/@ionic/cli)
   Ionic Framework               : @ionic/angular 5.6.0
   @angular-devkit/build-angular : 0.1102.4
   @angular-devkit/schematics    : 9.1.6
   @angular/cli                  : 11.2.4
   @ionic/angular-toolkit        : 2.2.0

Capacitor:

   Capacitor CLI   : 2.1.2
   @capacitor/core : 2.1.2

Utility:

   cordova-res                          : not installed
   native-run (update available: 1.3.0) : 1.0.0

System:

   NodeJS : v12.18.0 (/usr/local/bin/node)
   npm    : 6.14.6
   OS     : macOS Big Sur
the version of ng2-adsense was 9.1.0.
Create your project
ionic start adsense-demo blank --type=angular
cd  adsense-demo
Install plugin from here . https://github.com/scttcper/ng2-adsense
npm install ng2-adsensePlease note that you need to install the one that matches your version of Angular. You can specify plugin version as followings.
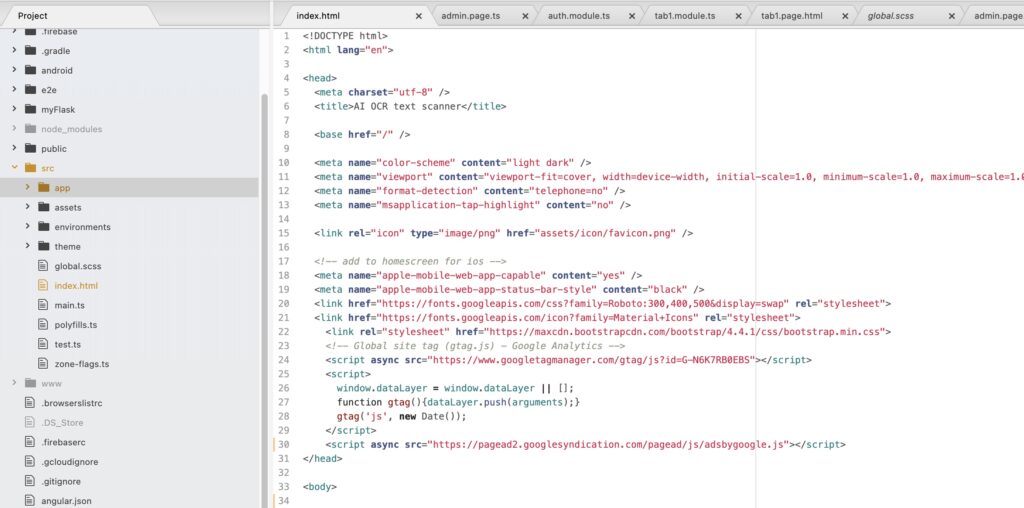
npm install ng2-adsense@9.1.0Next, add the following snippet in Index.html(above </head>).
<script async src=//pagead2.googlesyndication.com/pagead/js/adsbygoogle.js></script>It should look like the picture below.
Next, add following codes to the module where you want to place your ad. Officially, it says to add to app.module.ts, but please add it into the module you want to use. For example, add code into home.module.ts as shown below.

The codes you need to add are followings.
import { AdsenseModule } from 'ng2-adsense';@NgModule({
imports: [
<Other modules>,
AdsenseModule.forRoot({
adClient: 'ca-pub-XXXXXXXXXXXXXX',
adSlot: XXXXXXXXXXX,
}),You don’t have to add anything to home.page.ts.
Then add snippet below into home.page.html.
  </ion-header>
<ion-content>

<script async src="https://pagead2.googlesyndication.com/pagead/js/adsbygoogle.js"></script>
  <!-- ocr-app -->
  <ins class="adsbygoogle"
       style="display:inline-block;width:728px;height:90px"
       data-ad-client="ca-pub-XXXXXXXXXXXXXX"
       data-ad-slot="XXXXXXXXX"></ins>
  <script>
       (adsbygoogle = window.adsbygoogle || []).push({});
  </script>

  <ng-adsense></ng-adsense>
Please note the followings.
If you set ad style to responsive, it will not work. If you do not add it to the top of the ion-content tag, it will not work neither. I know it sounds strange, but I think Adsense doesn’t recognize content in Angular page. So I recommend you to do that.
Furthermore, it sounds strange to add the snippet starting with “<script” tag. However, this was also necessary for me to work.
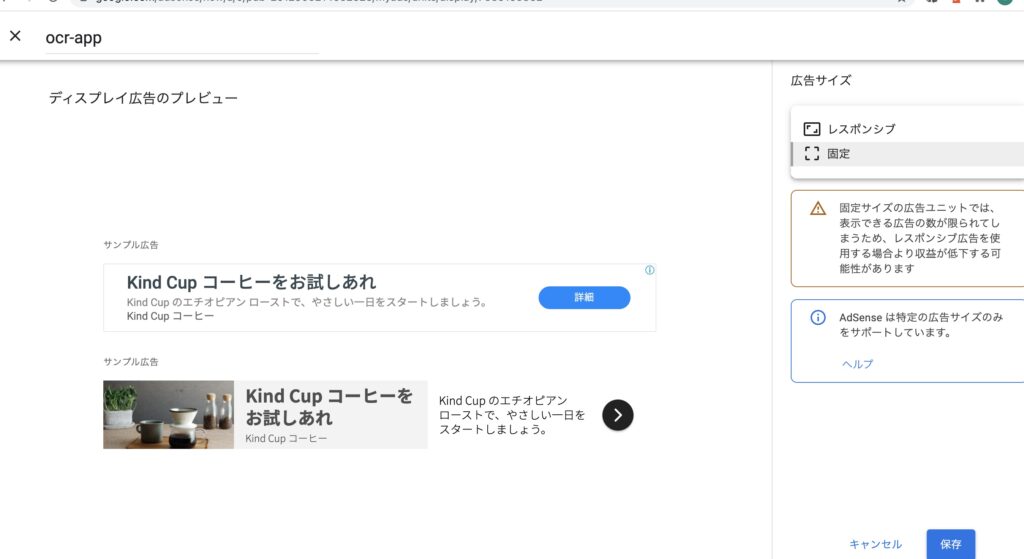
You can check adClient and adSlot and snippet in your adsense page.
To see your snippet, click the <> button at the bottom right of the screen below.

Also, to change the style of your ad from responsive to fixed size, press the pencil mark to fix it from responsive.
It it my pleasure to visit following demo site.
https://adsense-demo.np-sys.com
Thank you.
このように真ん中におきたい時
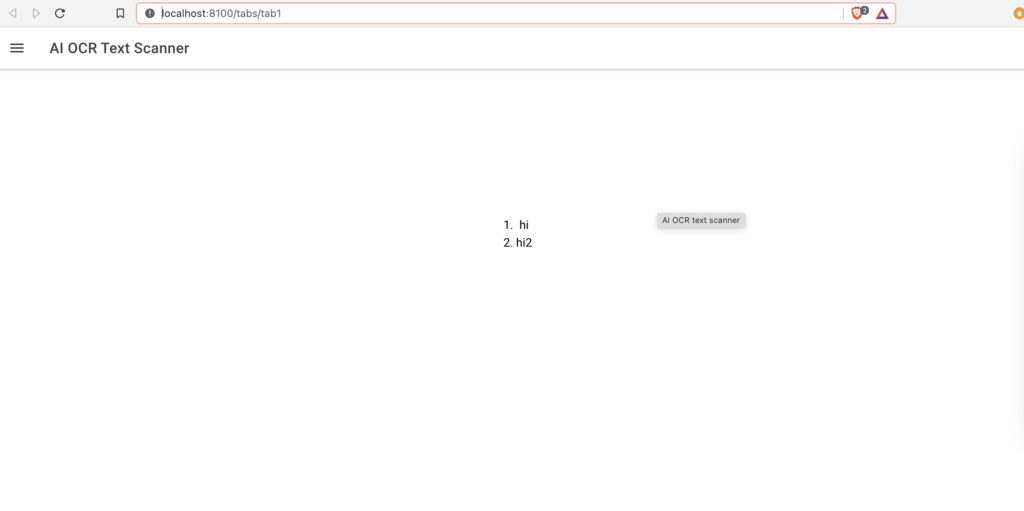
    <div class="ion-text-center my-class-parent">
        <ol class="my-class-child">
          <li>hi</li>
          <li>hi2</li>
        </ol>
    </div>
.my-class-parent {
height: 100%;
position: relative;
}
.my-class-child {
position: absolute;
left: 50%;
top:30%;
padding-left: 0;
}my-class-parentでBody要素に対する長さを100%に指定しており、それに対してmy-class-childで場所を指定している、
並べたい要素をまとめて囲ったTagにdisplay:flexをつけてやる.あとはboxの幅を100%で指定しているので,Imgで幅を指定したらそれを埋めてくれるようになる
                      <div class="flex">
                      <img src="assets/img/syabani.jpg" alt="" >
                      <div class="box">{{welcomeMessage}}</div>
                      </div>
.flex{
display: flex;
/*justify-content: center;*/
}
.flex img{
max-width: 100%;
width: 30%;
height: auto;
}
div.box{
width: 100%;
background-color:#CCCCFF;
}外貨預金としてFXを使用していますが、自動売買のようなものをやってみたくなりました。でもFXは外貨預金として始めたものだし、FXのギャンブル性に危険が怖くもあるので、外貨預金用の口座と自動売買用の口座を別に持つことにしました。
外貨預金用はSBIを使っています(アフィリエイトはやってませんが)
で、お小遣いを入れるのはOanda。こちらは3年前の口座を復活させました。
余談ですが、SBIFXは大変使いやすいです。外貨預金用としては非常にいいです。ただ、APIを提供していないです。というか、APIを提供しているのはOandaだけなんですよね。。カスタマーサポートは悪いし、スワップポイント低いしで以前愛想つかしたのですが、まぁAPIを提供しているのはここだけなのでしょうがないですね。
SBIFXは預金用です。売買は基本しません。超長期保有です。Oandaはお小遣い、遊びという位置付けです。自由にやります。昨日、名古屋の丸善でこんな本を買いました。おもしろかったです。これを実現するようなソフトを作成することにしました。
どうやってソフトを作ろうかという話で、最初はRasberryPi4にしようとおもったんですよね。メモリも4Gbあるので、これをローカルで動かして、為替データを取得して、グラフ化するというのはどうかというわけです。これは2018年に仮想通貨で使った手法なので簡単にできるのですが、なんか以前と同じ方法というのはつまらないと思いました。
そこで、今回はGoogleCloudPlatformとWebを使って同じことができないかと考えました。
GoogleCloudPlatformで行うことは2つです。
1。為替APIを使って定常的にデータベースへ保存する
2。保存したデータを取得するAPIをさらに自作する
そのうえで、
3。自作APIでデータを扱えるWebアプリを作成します。
で、GoogleCloudPlatformで上記を実現するのにGoogleAppEngineとGoogleCloudFunctionsのどちらがいいか迷いました。先日作成したアプリではGoogleCloudFunctionsを使っているのですが、GoogleAppEngineのほうがメジャーですし、別にGoogleCloudFunctionsで不満はないのですが使いやすいのかなと。。でちょっと調べてみたんですけど、そもそも値段が違うんですよね。GoogleCloudFunctionsは一つの関数しか割り当てられない代わりにものすごくやすい。200万回の呼び出しは無料で、次の200万回で1ドル程度の料金です。驚きの安さである一方、GoogleAppEngineは驚きの高さなんですよね。。一番安いプランでも月に7ドルかかってしまいます。一つの関数しか割り当てられないGoogleCloudFunctionsと比べて使い勝手はよさそうだけど、あまり使いこなせるのかと。。
https://cloud.google.com/appengine/pricing?hl=ja

AppEngineは時間に対して料金がかかります。アイオワのサーバでインスタンスを作成した場合、1時間あたり0.01ドルなので、月に7ドル程度はかかってしまいます。
CloudFunctionsの場合
https://cloud.google.com/functions/pricing

こちらの場合は、回数に対して費用が発生します。最初の200万回が無料ということなので、よっぽどアクセスを集められる以外はCloudFunctionsのほうがよさそうです。
ただ、CloudFunctionsの場合は一つの関数しかアップできないのであまり使い勝手はよくないかもしれません。まぁ、CloudFunctionsで初めてみてからの移行にしようかな。。
1
Formの場合はこちら
https://ionicframework.com/docs/v3/developer-resources/forms/
Note: If you use ngModel within a Form tag, you have to provide a name property. If you do not, you must set standalone to true in ngModelOptions
Angularでは、相方向バインディングを行うための二つの方法があります。一つはテンプレート駆動型、もう一つはリアクティブフォールによるものです。
こちらの公式
https://angular.jp/guide/forms-overview
によると、
ということです。
使いたいページのmodule、tsファイル、HTMLの3つに変更を加えます。
import { NgModule } from '@angular/core';
import { CommonModule } from '@angular/common';
import { FormsModule, ReactiveFormsModule } from '@angular/forms';
import { IonicModule } from '@ionic/angular';
import { Tab1p5PageRoutingModule } from './tab1p5-routing.module';
import { Tab1p5Page } from './tab1p5.page';

@NgModule({
  imports: [
    CommonModule,
    FormsModule,
    IonicModule,
    Tab1p5PageRoutingModule,
    ReactiveFormsModule
  ],
  declarations: [Tab1p5Page]
})
export class Tab1p5PageModule {}
import { Component, OnInit } from '@angular/core';
import { FormControl } from '@angular/forms';

@Component({
  selector: 'app-tab1p5',
  templateUrl: './tab1p5.page.html',
  styleUrls: ['./tab1p5.page.scss'],
})
export class Tab1p5Page implements OnInit {
  favoriteColorControl:formControl;

  constructor() { }

  ngOnInit() {
    this.favoriteColorControl = new FormControl('');
  }

}
<ion-header>
  <ion-toolbar>
    <ion-title>tab1p5</ion-title>
  </ion-toolbar>
</ion-header>

<ion-content>
  Favorite Color: <input type="text" [formControl]="favoriteColorControl">
{{favoriteColorControl.value}}
</ion-content>
1
Angular2以降でfirestoreのコレクションからデータ一覧を取得する方法。
コレクションに対して、valueChanges()をsubscribeする。valueChanges()ってなんだ。。
import { Component, ViewChild } from '@angular/core';
import { AuthService } from '../auth/auth.service';
import { AngularFirestore } from '@angular/fire/firestore';

@Component({
  selector: 'app-tab2',
  templateUrl: 'tab2.page.html',
  styleUrls: ['tab2.page.scss']
})
export class Tab2Page {
  authUid:string;

  constructor(
    public auth: AuthService,
    private firestore:AngularFirestore,
  ) {
    this.initialize();
    }

  initialize(){
      this.auth.getAuthUid().subscribe(uid =>{
        console.log(uid,'e');
        this.authUid = uid;
      })

  }

  test(){
    this.firestore.collection('users')
      .doc('data').collection(this.authUid)
      .valueChanges().subscribe(value =>{
        console.log(value);
      },
      error =>{
        console.log('error');
      })
  };
}
オブジェクトの配列で帰ってくる。
こちらの方がシンプル
                      this.firestore.collection('users')
                        .doc('data')
                        .collection(this.authUid)
                        .doc(String(new Date().getTime()))
                        //.doc('test')
                        .set({
                          'title':this.originalImgName,
                          'content':data,
                          'filename':this.originalImgName,
                          'lastUpade':String(new Date().getTime()),
});HMSとは、Huawei Mobile Serviceの略です。Google Mobile Service(GMS)のHuaweiバージョンです。
GMSとは何かがわかればHMSがどういうものかすぐにわかると思いますが、これは素のAndroidにGmail,YoutubeなどGoogle独自のアプリや機能を付与したものになります。
2019年からの貿易戦争により、アメリカは中国に対して禁輸措置をとりました。その結果、HuaweiはGMSに代わりサービスを独自で提供する必要に迫られました。具体的には、先ほど挙げたメールサービスやマップ、ユーザー認証などになります。詳細を見ていきましょう。
HMSには、利用者用のコンポーネント(AppGallery、その他のファーストパーティのHuaweiアプリとサービス)と、HMS Coreと呼ばれる開発者向けコンポーネントがあります。HMS Coreは、開発者がアプリの作成と改善に使用できるさまざまなAPI、SDK、およびサービスで構成されています。
Huawei ID
GoogleアカウントやAppleIDに相当します。ユーザーのデータをこれに紐づけて管理します。
Huawei Mobile Cloud
HuaweiIDごとに用意されたクラウドのストレージです。最大5GBまで写真や音楽などが保存できます。
Huawei Assistant
これはまぁSiriのようなものなのかと。
Huawei Themes
スマホのテーマを設定できます。
Huawei Music
音楽を管理します。
Huawei Video
動画を管理します。
Huawei Browser
専用のブラウザです。
Huawei AppGallery
Google Playに相当するものですね。
HMSコアには下記が含まれます。結構いろいろあります。
詳細は公式でどうぞ
https://developer.huawei.com/consumer/en/hms

Angular,IonicをWebアプリとしてデプロイする方法について記述する。
firebaseを使ってホスティングする方法と、Xserverでapacheでホスティングする方法を試した。firebaseでホスティングするのは(慣れてしまえば)至れり尽くせりであるが、先のことを考えると値段が気になるためXserverのほうが望ましいように感じた。
Xserverで既にドメインを持っていれば、そのサブドメインにデプロイすることで追加負担0でサイトをデプロイすることができる。速度も速いし、こちらのほうがいい。
https://qiita.com/M_Faust/items/a514b8a79d2fd13cb72b
https://qiita.com/daikiojm/items/89f46bd83c9a2285bbc6
が参考になった。
まず、ライブラリのインストールをする
npm install -g firebase-toolsログインする
firebase loginなお、.firebasercというファイルが生成されているので2度目以降はこれを消す。macならcommand + shift + . で隠しファイルを表示できる
初期設定を行う
firebase initなにをしたいか聞かれるのでHosting: Configure and deploy Firebase Hosting sitesをスペースで選択する。
What do you want to use as your public directory?
と聞かれたら、アップロードしたいファイル一式があるフォルダを指定する。私の場合はIonicだったのでwwwだった。
Configure as a single-page app (rewrite all urls to /index.html)? Yes
と言う質問については、Ionicなのでyest
File www/index.html already exists. Overwrite? (y/N)
これは、先のフォルダで指定した場所のindex.htmlをこの場でテスト用のものに上書きしますかと言うことなので、Noをしておく
その後、
firebase deployとすればいい。
流れは、xserverのファイルマネージャで確認できる場所へファイルをFTPソフトを使って自分でアップロードし、apacheの設定を.httpaccessとhtconfで行う
https://www.xserver.ne.jp/login_file.php
私はfirezillaを使った。
ionic build --prodで生成されるファイル郡をfilezillaでアップロードする。私の場合は、サブドメインだったので、サブドメイン用のフォルダ(pwaと言うもの)にアップロードした
その後、pwaの中に.httpaccessファイルを生成し、さらにルートフォルダ(public_html)にhttpd.confを作成し、編集した
<Directory "/pwa">
#   Options Indexes FollowSymLinks
    Options FollowSymLinks

#   AllowOverride None
    AllowOverride All

    Require all granted
</Directory>
.htaccessは下記
<IfModule mod_rewrite.c>
    RewriteEngine On
    RewriteRule ^index\.html$ - [L]
    RewriteCond %{REQUEST_FILENAME} !-f
    RewriteCond %{REQUEST_FILENAME} !-d
    RewriteRule . index.html [L]
</IfModule>Angular(Ionic)でStripeでクレカ決済を導入するにあたり、ソフト側の設定方法をまとめる。AndroidのPlay Storeでの設定方法は下記参照。
・クライアント側とサーバ側で処理が必要になる。
Stripeのダッシュボードにいくと、公開キーと秘密キーが得られる。

支払いを完了するさい、まずはサーバ側で支払い情報を作っておく。curlでとりあえずはいける。
curl https://api.stripe.com/v1/payment_intents \
  -u sk_test_秘密キー \
  -d amount=100 \
  -d currency=jpy
そうすると、返り値に下記が得られる。

ここにあるClient_Secretと言うものがあるのでこれを使って、ConfirmPaymentメソッドで支払いをクライアントを行う。
https://stripe.com/docs/js/payment_intents/confirm_card_payment
1
AngularでAdsenseで広告を出す方法です。
AndroidやiOSアプリで広告を出すためにはAdmobが利用可能ですが、AdmobはWebプラットフフォームをサポートしておりませんのでWebでは使えません。Webの場合はAdsenseを使う必要があります。
ところがAngularでAdsenseを利用する方法はほとんど情報がなく、ましてやIonicとなると皆無でした。非常に苦労しましたが、なんとかわかってきたのでまとめます。
ng2-adsenseを使います。しかし公式の通りにやっても動作しませんので、追加でHTMLページにコードを追加する必要があります。また、広告をレスポンシブにしない、ページの上部に設置するといった一見ナンセンスなことに注意する必要があります。
Angular11でIonic6です。
Ionic:

   Ionic CLI                     : 6.13.1 (/usr/local/lib/node_modules/@ionic/cli)
   Ionic Framework               : @ionic/angular 5.6.0
   @angular-devkit/build-angular : 0.1102.4
   @angular-devkit/schematics    : 9.1.6
   @angular/cli                  : 11.2.4
   @ionic/angular-toolkit        : 2.2.0

Capacitor:

   Capacitor CLI   : 2.1.2
   @capacitor/core : 2.1.2

Utility:

   cordova-res                          : not installed
   native-run (update available: 1.3.0) : 1.0.0

System:

   NodeJS : v12.18.0 (/usr/local/bin/node)
   npm    : 6.14.6
   OS     : macOS Big Sur
ng2-adsenseのバージョンは9.01でした。
https://github.com/scttcper/ng2-adsenseからプラグインをInstallします
npm install ng2-adsenseAngularとバージョンを合わせる必要がありますので、公式のGitHubから自分が利用するAngularにあったバージョンをインストールしてください。バージョンを指定する場合は@の後にバージョンを指定します。
npm install ng2-adsense@9.1.0次に、Index.htmlの<head></head>に下記のスニペットを追加します。
<script async src=//pagead2.googlesyndication.com/pagead/js/adsbygoogle.js></script>こんな感じになります。Angular、Ionicでscriptタグを利用することはほとんどありませんが、index.htmlなら貼り付けても動作しますので下記のようにしてください。
次に、広告を導入したいモジュールにコードを追加していきます。公式ではapp.module.tsに追加と書いてありますが、使いたいモジュールで追加してください。例えば下記のようなhome.module.tsを編集します。
import { AdsenseModule } from 'ng2-adsense';@NgModule({
imports: [
<Other modules>,
AdsenseModule.forRoot({
adClient: 'ca-pub-XXXXXXXXXXXXXX',
adSlot: XXXXXXXXXXX,
}),AdClientなどはAdsenseのサイトから確認していただけると思います。
home.page.tsには何も追加しなくていいです。home.page.htmlを次に編集します。home.page.htmlのion-contentタグの一番上に”<script”から始まる部分を追加します。
  </ion-header>
<ion-content>

<script async src="https://pagead2.googlesyndication.com/pagead/js/adsbygoogle.js"></script>
  <!-- ocr-app -->
  <ins class="adsbygoogle"
       style="display:inline-block;width:728px;height:90px"
       data-ad-client="ca-pub-XXXXXXXXXXXXXX"
       data-ad-slot="XXXXXXXXX"></ins>
  <script>
       (adsbygoogle = window.adsbygoogle || []).push({});
  </script>

  <ng-adsense></ng-adsense>
注意点は下記です。
です。これを見つけ出すのに非常に苦労しました。
広告のStyleはレスポンシブにすると表示されなくなります。ion-contentタグの一番上に追加することも似たように少しおかしな内容ですが、おそらくAdsense側でAngularのページは認識していないのだと思います。したがってページの途中に「最適な」形で読み込ませようとしてもそれが叶わないので表示されないのだと思います。それがレスポンシブにしたりページ途中に入れるとダメになることではないかと。
一方、ng-adsenseタグだけではなく、”<script”から始まる部分も追加するというのは意味がわかりません。AngularでHTMLにスクリプトを埋め込んでそれが機能するので意味がわかりませんが、動作させるためには必要でした。なんでサニタイズしなくてもいいのかは全くわかりませんが、動作はしました。
なお、adClientとadSlot、追加用のスクリプトなどはadsenseのホームページから確認可能です。
スクリプトの確認のためには下記画面の右下の<>のボタンをクリックしてください。
また、広告のスタイルを固定するためには、鉛筆のマークを押してレスポンシブから固定にします。
まじで苦労してけど表示されるようになった。
AngularでSEOに配慮する場合、何に気をつければいいかGoogle Developers Codelabsで勉強したのでその内容を記載します!
https://codelabs.developers.google.com/codelabs/making-a-single-page-app-search-friendly
Google Developers CodelabはハンズオンでGoogleのサービスが学べるもの
モバイルファーストと言われて久しいですが、まずはモバイルフレンドリーかチェックをするように記載されていました。
便利なサイトが紹介されていて、このサイトでリンク貼り付ければ調べられます
https://search.google.com/test/mobile-friendly
2番目に紹介されていたのは、基本的なことだが、ページにタイトルを付与し、メタデータディスクリプションを設定することだった。確かにAngularで作成する際、設定したことがなかった。勉強になった。AngularのConponentに直接タイトルとメタデータディスクリプションは設定できないとのことなので、BrowserModuleを使って設定するとよさそう。
https://www.atmarkit.co.jp/ait/articles/1802/05/news142.html
https://www.atmarkit.co.jp/ait/articles/1803/30/news135.html
google botがURLを見つけられるようにリンクをちゃんと記載する。
Codelabにはこう記載があった。
A few tips on links
As a rule of thumb, to make sure Googlebot finds all views, make sure that:
<a href="">href attribute (no javascript: URLs)/#example” or “/#!example“, sometimes called a hash URL)要するにハッシュタグを使わないこと、aタグを使うようにとのこと、JavaScriptでレンダリングしないようにするとのことだった。
例として出されていたのは下記
<button class="mdc-button mdc-button--outlined">
  <span class="mdc-button__label">Learn more</span>
</button>
はこう書く
<a class="mdc-button mdc-button--outlined">Learn more</a>対応するJavaScriptはこレから
item.querySelector('button').addEventListener('click', function () {
  location.href = story.link;
});
これに変える
item.querySelector('a').setAttribute('href', story.link);このサイトでパフォーマンスを調べると良いとのこと。
https://developers.google.com/web/tools/lighthouse/
ページが見つからない場合、リダイレクトするようにする
https://codelabs.developers.google.com/codelabs/making-a-single-page-app-search-friendly/#6
大変勉強になった。AngularだからSEOが不利というわけでもなさそうです。
1
ついに新しいMacが届きました。2019年の秋に購入したのですが、128GBのストレージがいっぱいになってしまったので新しく購入しました!(2021年追記。この記事を書いたのは2020年の夏くらい)
テンションあがります!!
普通のダンボールで届きました。

代引きにしたので玄関口で20万8030円を支払い、無事に受け取り。


箱から恐る恐る出して机に起きました。ドキドキしますね。
開けるとこんな感じです。

PCを取り出すとこんな感じ。


さて、早速開きます。

名前の入力、言語の設定、データの扱いに関する設定のあと、タイムゾーンを設定すると5分ほどで無事に立ち上がりました。うれしいです。


Catalinaの新しいデスクトップですね。
まず、さっそく日本語入力と英語入力の設定を行います。
Appleのマークからシステム環境設定を選びます。

そのあと、キーボードを選択します。

4番目のTabの入力ソースから設定します

下側の画面からはずれたところに3つのチェックボックスがあり、このなかのCapsLockでエイジ入力と切り替えるでOKです。
システム環境設定からトラックパッドを選んで、2番目のTabでスクロールの方向:ナチュラルの選択を解除すればいいです。
システム環境設定からDockを選びます。
わたしは小さめにして、左にして、普段は隠すようにしました
システム環境設定からトラックパッドを選んで、副ボタンの設定を行います。今回から同時に日本の指で押して右クリックするようにするので設計しません、
バッテリーアイコンの上でクリックして設定するだけです。
どこかのフォルダでcommand shift . を押します
その他
Macにはbashrcとbash_profileが最初からないので、ユーザーのルートで.bash_profile と.bashrcを作成します。.bash_profileがログイン時に実行され、.bashrcはターミナル起動時の実行となります。
.bashrcに下記を記入しておきます
alias o=’open ./’
alias p=’pwd’
alias l=’ls’
alias n=’cd ~/Desktop;open ~/Desktop’
→と思ったのですがうまく反映されず。
catalonaからはbashではなくてzshに変わったようです。ホームディレクトリに.zshrcと.zshprofileを作成します。立ち上げた時に実行されるのが.zshprofileでターミナルを普通に立ち上げた時に実行されるのが.zshrcです。
https://qiita.com/ktr_type23/items/3eb782f98c7a5f4c60b0
ソフトウェアをインストールします。
| 項目 | ||
| Chrome | 普通にインストールします。dmgファイルをインストールしてから、ダブルクリックで起動して画面の操作にしたがってアイコンを移動するだけです。インストールあと、dmgファイルはゴミ箱に移動です、 | |
| node.js | https://nodejs.org/ja/からインストールしました。pathの設定が勝手にされたのでそこがよく分からずですが、使えるようになったのでよしとします | |
| Anaconda | https://www.anaconda.com/products/individualからインストールします.普通にインストール完了。 | |
| AndroidStudio | https://developer.android.com/studioからインストールします。 | |
| Ionic | https://ionicframework.com/docs/intro/cliを参考にして、sudo npm install -g @ionic/cliでOK.ionic -vで情報表示されたらOK | |
| Filezilla | https://filezilla-project.org/download.php?platform=osxからインストール。HPが古い感じだったので警戒したがURLでここと判断.FileZilla_3.48.1_macosx-x86.app.tar.bz2というtar.bz2なので、それをダブルクリックするtどう改装に保存される。アプリケーションフォルダに移動する | |
| GImp | https://www.gimp.org/ | |
| VScode | https://azure.microsoft.com/ja-jp/products/visual-studio-code/からダウンロード | |
| Atom | https://atom.io/からダウンロード | |
| Capacitor | https://capacitor.ionicframework.com/docs/getting-started/を参考にして、npm install –save @capacitor/core @capacitor/cliでインストール | |
| Xcode | https://apps.apple.com/jp/app/xcode/id497799835?mt=12からインストール |
| Coccoapod | npx cap add iosをした時に必要と言われたので、、https://cocoapods.org/に基づいてsudo gem install cocoapodsでインストール |
| Vivaldi | https://vivaldi.com/ja/からインストール |
| FIrefox | https://www.mozilla.org/en-US/firefox/download/thanks/からインストール |
・Githubように .sshをホームディレクトリに配置。
・
めちゃくちゃ苦労した。全て記録に残せたわけではないが、少なくとも以前のMacは必要なかった。
AppleDeveloperサイトに行って、ログインする。Certificates, Identifiers & ProfilesからPlatformのカラムがALLのもののうち、DevelopmentとDeistributionを選んで、ダウンロードしてキーチェーンに登録する。これを新しい方でダブルクリックして登録する
それと、app developer idでパソコンでログインして、新しいMacを登録する。そうするとチームが選べるようになる。
基本的には以上の二つでOK.ってこんだけのことだったっけ?
1
XserverでAngular(Ionic)をホスティングする方法です。
流れとしては
<IfModule mod_rewrite.c>
    RewriteEngine On
    RewriteRule ^index\.html$ - [L]
    RewriteCond %{REQUEST_FILENAME} !-f
    RewriteCond %{REQUEST_FILENAME} !-d
    RewriteRule . index.html [L]
</IfModule>
常時SSL化するためには、2つのことを行います
https://www.xserver.ne.jp/manual/man_server_fullssl.php
まず、無料独自SSLを導入します。これでHTTPSで接続するとSSL通信できるようになります。
さらに、HTTPで接続した時に自動でリダイレクトするように.htaccessに下記を追加します。
RewriteEngine On
RewriteCond %{HTTPS} !on
RewriteRule ^(.*)$ https://%{HTTP_HOST}%{REQUEST_URI} [R=301,L]
なので最終的には、下記の.htaccessを作成して、サブドメインのプロジェクトのルートフォルダに設置すればいいです。
RewriteEngine On
RewriteCond %{HTTPS} !on
RewriteRule ^(.*)$ https://%{HTTP_HOST}%{REQUEST_URI} [R=301,L]

<IfModule mod_rewrite.c>
    RewriteEngine On
    RewriteRule ^index\.html$ - [L]
    RewriteCond %{REQUEST_FILENAME} !-f
    RewriteCond %{REQUEST_FILENAME} !-d
    RewriteRule . index.html [L]
</IfModule>
1
ロイヤルエージェント株式会社を利用して転職活動を行いました。結局縁がなかったのですが、転職エージェント選びは転職をする上で大事な選択です。そこで、転職を検討している方のためにロイヤルエージェント株式会社2ヶ月程度利用をする中で感じたことを記載します。
まとめると下記の3点です
ROYAL AGENT株式会社は2018年に設立された会社です。元リクルートで求人業務をしていた長岡裕己さんという方が創立されています。AIやデータサイエンス領域に特化した人材紹介事業、データ活用コンサルティングをされています。
メールのレスポンスも早く高いビジネススキルを感じましたので、その点は良かったです。ただ、個人的には応募者を右から左にただ流しているような印象も受けました。あまり経歴書のアドバイスなどもなかったですし、もう少し言ったことだけではなく突っ込んで相談に乗ってほしかったかな。方針が決まった30代向けのエージェントなのかもしれません。個人的には5点満点だと2点をつけたいと思いますが一般的には3点かな。人によっては4点5点かも。
紹介いただいたものは年収レンジも高かったです。リクルートやDENSO系、分析会社の求人がありました。ただ、個人的にはSES企業はあまり興味はなかったのでリクルートを受けました。条件厳しくしたのでその中で紹介いただいたのはとてもよかったです。一方、結構玉石金剛というか、個人的な繋がりで紹介している求人が多いと感じました。リクルート然り、知り合いが立ち上げた会社とか。結構偏っていると感じたのでちょっとこれは微妙だったかな。
以上から、他の大手エージェントと合わせて利用すると良いと思います。
一部いい求人を紹介してくれるので良かったですが、あまり手厚いフォローもないし、ビビッと来るものを紹介されたら利用してみる。でもメインのエージェントは別にもった方がいいと思いました。相談する相手という感じではないし、向こうもポンポンしたペースを望んでいると感じました。どちらかというと30代向けのエージェントです。
1

OandaのAPIの実質負担金額について説明するよ
2021年3月までFXでAPIといえばOandaというくらい有名だったOanda APIですが,とあるベンチャー企業のAPI不正利用とみられるトラブルにより2021年3月から無料で利用できなくなりました.2021年5月においてOandaAPIを利用するに当たっての条件と費用についてまとめます.
従来は20万円の入金によりOanda APIを無料で使うことができましたが,現在は月に50万ドル以上の取引を毎月行ってゴールド会員になる必要があります.海外の業者だと月当たり1000アクセスまでは無料で配信する会社があるのですが(※末尾にリンクあります)Oandaのようにオーダーブックは提供していませんので,PythonなどでFXの自動売買を検討する場合,Oandaを利用できれば大きな強みになります.
2021年現在,Oanda APIを利用するには月に50万ドル以上の取引を行いゴールド会員になる必要があります.会員ステータスはRegular,Silver, Goldの3区分で
取引量の算出は往復で算出すると言うことですので,例えばUSD/JPYでUSD25万を新規で買いUSD25万を決済する(売る)とUSD50万として計算されGOLD会員となります。1ドル100円とすると5000万円ですのである程度大きな額を売買する必要があります.
では,50万USDの取引は実際どの程度のコストなのでしょうか.スプレッドから算出すると現実的な数字が出てきます。
OANDAのプロコースのスプレッドは0.8pipです。ベーシックならこの半分ですが、APIを使うならプロコースが前提となるため,GOLD会員になるための費用(=APIの利用費用)は下記のようになります
(0.8)*50*10000/100 = 4000円
月に4000円でOanda APIが使えるという計算になりました.50万ドルの取引と言われるよりハードルは下がりますが,以前は無料だったことを考えるとかなり高いという印象です.
月に250回までなら無料です.
https://exchangeratesapi.io/pricing/
個人的には一番信頼感があります.月に1000回までなら無料ですし,12ドル払えば1時間ごとのデータが得られます.
有料ですがまぁ信頼感はあります.
https://www.xe.com/xecurrencydata/
また,OandaがAPIの無料提供をやめた理由については下記に書きました,QUOREA FXはほんと迷惑です。
読んでくれてありがとう.これからもよろしくね
1
QUOREA FXがOANDAのAPIを無断で使用していることもあり、OANDA APIを使用したFXの自動売買ができなくなってしまいました。明確な原因はOANDA内部の人間ではないのでわかりませんが、長年提供してきたOANDA APIが突然使えなくなり、同時にQUOREA FXを運営している株式会社efitを名指しで非難するメールが公式メールとしてきていることから判断すると、QUOREA FXのせいだと考えても妥当だと思います。QUOREA FXを運営している株式会社efitは非常に迷惑だと思います。
QUOREA FXは、AIによる高度な投資戦略が使える自動売買プラットフォームと謳っています。きれいなランディングページを作っていますが、実態はOANDAのデータを元に作成したWebシステムのようです。最近はPythonやDataRobotを使えば簡単にAI分析はできますから、浅薄なサービスとだと思います。
OANDAから名指して非難するメールはこちら。
【重要】QUOREA FXを利用されるために口座開設されたお客様へ
平素はOANDA JapanのFXサービスをご利用いただき、誠にありがとうございます。 近頃、QUOREA FXおよび弊社の提供するAPI関連についてのお問い合わせが多く寄せられております。しかしながら、QUOREA FXを運営する株式会社efitは、弊社の配信レートおよびシステムを無断で使用し、営業しており、同社と弊社の間には何の契約もございません。 従いまして、株式会社efitのサービスについてサポートすることは致しかねます。 また、株式会社efitのウェブサイト等で、弊社があたかも「取引所取引」を提供しているような表現がございますが、弊社の外国為替証拠金取引は、お客様と弊社との間での「相対取引」でございます。どうぞ誤解のないようお願い申し上げます。 なお、弊社がお客様へ発行するAPIトークンを第三者と共有等をすることは、弊社での口座開設時に同意された利用規約に反する行為でございます。口座を閉鎖する場合もございますので、十分ご注意ください。 弊社口座に建玉がある場合には、弊社取引システムをご利用頂き、ご自身の判断で決済くださるようお願いいたします。建玉のお取引に関し、ご不明な点等ございましたら、弊社カスタマーサービス(0120-923-213)へお問い合わせください。 QUOREA FXのサービスについては、株式会社efitに直接お問い合わせください。またQUOREA FXのサービスに何らかの問題等がある場合には「金融庁 金融サービス利用者相談室(0570-016811)」あるいは「特定非営利活動法人証券・金融商品あっせん相談センター(0120-64-5005)」までお問い合わせください。 今後ともOANDA Japanをご愛顧賜りますよう、何卒よろしくお願い申し上げます。
今後ともOANDA Japanをご愛顧賜りますように、と書いてありますが、今回のAPIの提供制限はあまりにも改悪ですからね。。個々の事例の中で判断すれば良かったのではないかと思います。
もし影響が株式会社efitのせいだとすれば、非常に迷惑な話です。
ついでに言うと、株式会社efitの代表がMENSA会員であることを公言しているのが顧客には心底どーでもいい話で、逆立ちしても好きになれません。
現在、Oandaでどれくらいの費用でAPIを利用できるのかスプレッドから計算してみたら4000円くらいでした。
1
2021年2月はじめに突然Oandaからメールがきて多くの改悪を行うということでびっくりしました。今までも一方的な変更が突然起こり辟易して来ましたが、今回の変化は大きすぎます。
| 【重要】デモ口座の利用期限およびオーダーブックインジケーター、APIの利用条件変更について |
| お客様各位 平素は、弊社のサービスをご利用いただき誠に有難うございます。 この度、デモ口座の利用期限を設けさせていただくとともに、オーダーブックインジケーター、およびAPIのご利用条件を変更させていただくことになりましたので、ご案内いたします。 はじめに、これらの判断に至った経緯は次の通りです。 デモ口座の利用期限の導入の経緯について これまでデモ口座は期間無制限で使用可能でしたが、過去に作成されたものの、現在は未使用で放置されているデモ口座のデータが蓄積され、膨大なデータ量がサーバへの負荷となっていること、また、商用利用をはじめとして一部で、デモ口座の本来の目的以外で使用しているケースが散見され、サーバに負担をかけているためです。 オーダーブックインジケーター、APIの利用条件の変更の経緯について インジケーター、API提供の本来の目的である弊社との取引以外の目的での使用が多数見受けられ、サーバへの負担が増加しているためです。 いずれも、サーバへの負荷を高め、システム障害発生の原因となり、実際にお取引をしていらっしゃるお客様にご迷惑をおかけする原因の一つです。昨年はこのような事例が実際に発生しておりました。 このため、これらの無制限であったサービスの一部に制限をかけることで、実際にお取引されているお客様へのサービスの品質向上を目指すことこそがお客様にとっても、弊社にとっても健全であると判断し、このような決定に至りました。 何卒、ご理解のほどよろしくお願い申し上げます。 制限対象になるお客様に弊社のサービスをより理解していただくために、移行期間である2021年2月はキャンペーンとして、本番口座を保有しているお客様全員にゴールド会員資格をプレゼントさせていただきます。この機会のゴールド会員のサービスをお試しください。 |
| デモ口座の利用期限について |
| 本年2月1日からは、デモ口座の利用期限を当該口座開設後30日間とさせていただきます。 ただし、以下の条件を満たすお客様は継続してデモ口座をご利用いただけます。1. 本番口座ステータスがゴールド(Gold)であること。2. 本番口座のマイページから、種類ごとに1つのデモ口座を登録すること。 利用期限を経過、またはゴールド会員を失ったことによりデモ口座の利用権を失った口座はロックされます。(ログインできません。) ロックの解除にはロック後60日以内にゴールド会員のステータスに昇格(回復)後、再び本番口座のマイページより、当該デモ口座の登録を行うことでロックを解除することができます。(過去に登録していた口座に関しても再登録が必要です。) なお、60日以内にロックの解除が行われなかったデモ口座は閉鎖され、復元することはできませんのでご注意ください。 |

| 移行期間2021年2月1日より、デモ口座の利用期限を設定させていただきます。既存のデモ口座につきましては、利用期限を2021年2月28日までとさせていただきます。 ゴールド会員の方でデモ口座を継続使用される場合は2月末までにマイページより必ずご登録願います。(ご登録は2021年2月2日以降行うことができます。) |
30日と言っていますが、その後、2月28日を待たずにOandaのデモ口座ではAPIも使えなくなりました。今までも一方的な変更が突然起こり辟易して来ましたが、今回の変化は大きすぎますね。。
GitHubのREADME.mdをグラフ入りで効率的に書く方法です。
これが一番早そうです。